Saturday, December 31, 2016

Emerald Creek Craft Supplies Year End Recap

It's been a good year for me.  I wasn't my craftiest.  I blogged way less this year than last year, but I kept up posting on Instagram(check me out @twomaddahlias).  I ended the year on a positive note.  I joined the Emerald Creek Craft Team back in September after doing a couple guest posts.  I wanted to give you a little recap to show you what fun I have had using Kim's products.
 

Her embossing powder is the BOMB! You have to check it out.  

I cannot wait to show you what we have in store for the new year.  I even get to go to CHA with Emerald Creek.  I am beyond thrilled. 
 I will also be joining the Gypsy Soul Laser Cuts design team and the Canvas Corp Brands design team.  Watch this space 2017 is going to be amazing.  
Jess


Saturday, December 17, 2016

Winter Wishes

Hi Everyone,

I bet you thought I had fallen off the face of the earth.  I'm still here.  I just haven't been crafting.  I think this is the longest dry spell I have ever had.  All of my usual tricks for sparking my crafty mojo just didn't seem to be working. I looked at my favorite blogs, read my favorite magazines, pinned a billion projects on Pinterest, and nothing.  I pulled out all of my Christmas decor and finally a little spark. The spark made me run to the craft room and pull out my Christmas box; you know the huge box of Christmas stuff you hoard for Christmas crafting? It sits beside the Halloween box, the Easter box, the Valentine's day box? Please tell me you all have these boxes and it's not time to call in the professionals for help.
I pulled out a bunch of goodies and stared at them.  Then I went to my box box(the box I keep boxes in to craft with) and dug out a small box that my headphones came in.  I knew it would make a perfect shadowbox.
I lined the box with vintage sheet music.
The box is a slate gray color and wanted to keep the color.  I rubbed embossing ink on randomly and then used Clear Embossing Powder for detail.  It wasn't enough.  I slapped on a thick coat of Rock Candy Crackle and let it dry.  While the crackle dried I worked on my interior elements.
I used the mini deer and the mini snowflake mover and shapers from Sizzix.  The deer got a nice coat of Charred Gold Embossing Powder. The snowflakes shimmer with Soft Fallen Snow Embossing Powder.  I love the Soft Fallen snow powder.  There is an iridescent glitter in it and it has a lovely twinkle.  
By now my crackle was dry, but it was lacking something.  I used Distress Stain in Tarnished Brass to highlight the cracks.  The underlayer of Embossing Powder made for some really cool crackles.  

And here is the part of the creative process where I got so excited I stopped taking pictures.
  The bottle brush tree is colored with several shades of green Distress Spray Stains-Evergreen Bough, Moved Lawn, and Iced Spruce. Once the tree was dry I used Glossy accents to get Soft Fallen Snow Embossing powder to stick on the tree.  I didn't heat the powder.  I just let the glue dry and I got perfect snow on my tree.  Once the powder was dry I used some of my vintage mercury glass beads to decorate the tree.  A mirrored star and a bit of mushroom alcohol ink tops the tree.
The tree got glued in the corner and the deer was popped in front.  I put the embossed snowflakes on the back and then using fishing line I added several Snowflake Charms.  I poked hold in the box using a craft knife and just tied tiny knots to hold them up.  To cover the holes and fishing line I made a big bow using seam binding and Barn Door Distress Stain.
The bottom was sprinkled with mica snow.  
The finishing touch was a bit of German scrap edging. 
  

A pretty little addition to the Christmas crew.  Not too shabby for a headphone box. 
Don't forget to enter the Winter Wishes Dare and you have a chance to win a $50 gift card to the shop. 
I hope you all have a wonderful holiday surrounded by friends and family.  
Merry Christmas,
Jess

Awesome Emerald Creek Supplies used:

 Snowflake Charm
Charred Gold Embossing Powder
Soft Fallen Snow Embossing Powder
Clear Embossing Powder

Sunday, November 6, 2016

My Spirit Cannot be Caged

Hi Everyone,
Since my crafting mojo seems to be on a hiatus right now I thought I would revist some Fairy Cages I made when I was on the Unruly Paperarts design team.  The theme was "Winging It" and those of you that follow me here and on other social media know I am a sucker for a good fairy.


I bought these tiny bird cages on clearance and stashed them knowing that I would find a use for them. I use images from Lisa's Altered Art all the time. She has fantastic ballerinas, women, children, and wing images. When I was playing around one day I discovered some of the girls would fit right in the cages. I added wings to them to make them into fairies. They got all gussied up with tulle skirts, feathers, and bits of bling.


I added a ton of flowers to the bottoms of the cages. Some of the flowers I made and some I purchased. I didn't want the cages to close, so the flowers spill out and wrap around the bases.


The base on this one is a giant wooden spool that is wrapped with twine.


The base on this one is a plaster pillar of some sort (again from the craft hoard). I added a little birdy to the outside of the cage and it's done!


Here's hoping my mojo comes back soon!

Jess

Tuesday, November 1, 2016

Red Poppies to Remember

Hi everyone,
The newest challenge at Emerald Creek is Heartfelt Freedom and Festivities.  I decided a little paper girl would be a perfect make for this challenge.
Who could refuse this cute face? She is here with a sweet smile and a bouquet of poppies.
Here's how she came together.  I started by cutting out a dress and coating it with matte medium.  Once the dress was dry I colored it with Distress Crayons.  

I used my Enhanced Blue Pearl embossing powder on her skirt over a tiger lily stamp.  For her shirt I used my Mercury Rising embossing powder.  
  To make her flowers I used Candied Apple Distress Ink on tissue paper and embossed it with clear..  The stamens were dipped in Mercury Rising embossing powder.  I free hand cut circles and then made teeny flowers.  
The background is a collage of vintage papers and coated with Vintage Collage Medium.  
While the background dried I finished the girl.  
I cut out arms and legs from white cardstock.  I drew lines on with a Black Soot Distress Marker.  She got a little flower in her hair too.   The edge of the tag has a bit of Distress Crayon rubbed on it.     
Here is is all finished.  
I hope you liked her. 
Be sure to check out the Emerald Creek Dares you have a chance to win an awesome prize if you play along!
Jess

Emerald Creek Goodies I used:


Friday, October 21, 2016

Teacups with a touch of sass

Hi Everyone,
I am sure a bunch of you hit your local Joann a few weeks ago when they were clearancing out a bunch of their dies.  I scored some I had my eye on and a few I was indifferent to.  I am not a coffee or tea drinker, so the tea cup die from Tim Holtz and Sizzix was not a must own for me.  For $6 I can make anything work!
I had so much fun putting my sassy ladies in their snarky tea cups. *Warning a couple use some foul language*
My ladies are all from Lisa's Altered Art.


They all have a little remnant rub or phrase on their tag.  

The little cuts in the top of the cups are perfect for sliding the girls in.  

Using double sided paper made putting the cups together a breeze.  

Some of the girls have bling.

Some just let their expression and the quote say it all!

What would your snarky teacup say?
Jess 
Creative Artiste Mixed Media Anything Goes Challenge
More Mixed Media Anything Goes Challenge

Monday, October 17, 2016

Fall is in the air

Hi Everyone,
Ahhh, triple digits are gone so it must be Fall in Arizona.  I live right near Phoenix, so no changing leaves for me.  I grew up in Massachusetts and I think that's why Fall is my favorite season.  I don't know why but Autumn always makes me reflect on what I have and what I am thankful for.  This little wreath reminds me that there is something to appreciate every day.


I want to apologize for not taking photos while I worked.  I am really bad about getting caught up in creating and forgetting to take pictures.

 I die cut my leaves, out of manila, and used different Distress Inks to make them colorful.  I just grabbed anything that looked like I could use it-reds, oranges, yellows, greens, and browns.  I used a lot of color and really saturated the paper.  Once the ink was dry I covered the leaves in Distress Rock Candy Crackle and set them aside.

The Rock Candy gives the leaves a gorgeous crackle and shine.  You can leave them just like they are after this step and they look amazing, but I wanted to add a bit more.  I used my embossing powders to make them pop! I love how they turned out.


Next I took a huge bunch of seam binding and died it using Distress Stains.  I kept a lot of the colors I used in my leaves on the ribbon.  I wrapped a word band on the ribbon and tied a big fussy bow.  Pinecone charms add an extra fall touch.  I cut the bales off and just glued them on the ribbon.  Embossing powder on the ribbon gives it extra sparkle too.


For the final embellishment I used a round cabochon charm and some fall berries.
Try making some leaves.  They are super fun and playing with the different inks and powders will produce a different effect each time.  
Jess


Fabulous Supplies available on Emerald Creek: 

Other supplies: 
Seam Binding
Wreath
Word Band
Word Token
Brad
Distress Rock Candy Crackle


Wednesday, October 12, 2016

Pinners Conference!

Hi Everyone,
Last week my Mum and I went to the Pinners Conference in Arizona.  I had been wondering about going and an Instagram friend told me to go, that she had a blast.  If you don't know about the Pinners you should check out their website.  It will give you all the info about the show.

We decided to go big and went VIP.  On Thursday evening they had a VIP party.  We got  a GIANT swag bag and the opportunity to do make and takes from several of the sponsors.  The swag bag alone made the VIP worth it.  We got spoiled.

On Friday and Saturday, we had signed up for several classes.  Some of the classes were free and some had a materials fee.  I tried so many crafts that I was interested in, but didn't really want to go out and spend money on tons of supplies only to discover I either hated it or I sucked at it.

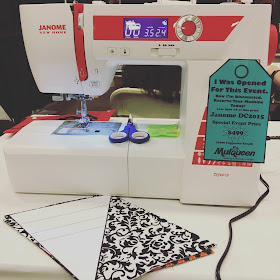
I sewed.  My mum sews.  She sews beautiful, amazing, wonderful things. Sewing scares the crap out of me.  I like working with paper.  If I screw up cutting a piece of paper I am out maybe $1.  If I screw up cutting a piece of fabric, that's a whole lot of money I'm just tossing away.  I figured taking a simple class at the show would be an easy, no pressure way, to try sewing.  The teacher even walked by me at one point and said she was impressed.  Whew!

I made that banner.  It's not perfect, but only I can see where the goofs are and I could always cover them up with some nifty die cuts or a pompom.  
I told my mum I would like the machine she has stashed for me at her house, just in case the day ever came that I decided I wanted to sew.  


I tried embroidery.  Man, my old eyes did not like the teeny stitches or the tiny needle.  My pieces are a little wonky, but I did it.  I made all three necklaces in the kit. Heather was an awesome teacher.  She was so positive and also gave us tons of tips.  We didn't leave class with a full completed project, but I learned so much about embroidery.  I left wanting to complete my projects and excited to be able to do them.  My kit has patterns for a few more and I think I might need to make a few more of the little bird necklaces.  


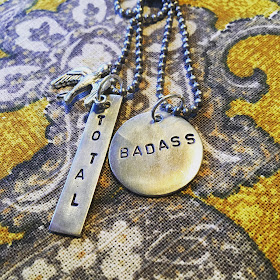
I stamped on metal.  Like. A. Badass.  I have to say this class was a huge let down.  I made a fun piece, but not due to anything I was taught(and I use that term very loosely here) in class.  It was bad.   I won't go into detail, but I learned more reading an article from Pinterest than I did I class.  As it turns out, metal stamping is not hard.  You just kind of need to go for it!

  
We made stunning crepe paper flowers.  I haven't finished my project from that class yet(this photo is from her website).  If you get a chance look at Lia Griffith's flowers.  The woman is amazing. 

We learned how to make a billion different types of bread.  We learned some fun and easy dips for the holidays.  We just had fun.  
In addition to the classes there is a huge trade show.  There are make and takes all day at the various booths.  Best part for me was as a VIP we had access to all the soda we could drink.  Spending 12 hours at an event-I need unlimited soda!
Here's to trying new things, finding new hobbies, and new recipes.
Jess


Thursday, October 6, 2016

Tim Tag for October

Here is my take for the October tag.  
The butterfly is layered up. I did the wings really bright on the bottom by just dripping on the alcohol ink.  For the top butterfly I used my applicator and then used black soot distress paint over it.   
Jess


Thursday, September 29, 2016

Trick or Treat

Hi Everyone, 
I'm back with more spooky delights.  I am not sure if I've talked too much about what I do for my pay the bills job.  Last year around this time I left the company I had been with for 15 years and moved to a new retail spot.  I am a store manager for a company that makes stuffed animals(yes, I am being intentionally vague here).  I try to keep it fun.  I know that most of the kids that work for me aren't going to be with me forever and for many it's a first job.  I loved my first job.   I want my team to look back on this job and remember it fondly.  This month I challenged them to take home one of the boxes we send our animals home in and transform it into something for Halloween.  We will use them to decorate our break room.  I never ask them to do anything I wouldn't do myself, so here is my take on the project. 
When I started this I had no idea where I wanted to take it, but once I used my Graphic 45 paper for the sides it really took off.  
Doesn't he look happy to see you? And he has a pumpkin for you too. 

There is a metal band that runs all around the top that I painted with a thin layer of black paint to grunge it up a bit.  The border is a Tim Holtz die and it makes a perfect little fence.  


When I glued it down I left gaps and bubbles so I could cram moss in there.  

I don't know if these little kids are frightened by the skeleton or the giant spider.  

Ok, here you can really see the labor of love on this project.  That roof!


I think I put down about a million tiles. 
I have more respect for roofers now.  
Until next time,
Jess