Hi Everyone,
I'm up on the Gypsy Soul Laser Cuts blog today. I have an award for your best witch.
Start by embossing your Small Swirl Medallion using Oil Rubbed Bronze embossing powder from Emerald Creek.
For the base of the ribbon I took a bright green ribbon and sprayed it with Distress Spray stain in Picket Fence to give it a good base coat. Once the Stain was dry I used various Distress Stains stains( Fossilized Amber, Tea Dye, Walnut Stain) and paints( Distress Paint In Mowed Lawn, Black Soot,, Hickory Smoke; and Prima Art Alchemy in Blackberry and Brass Hardware) to get the color I wanted. This is the center of the ribbon that I popped off, but you can see the base colors. I added a lot more flicks an splatters before I called it complete.
I added a lot more flicks and splatters before I called it complete.
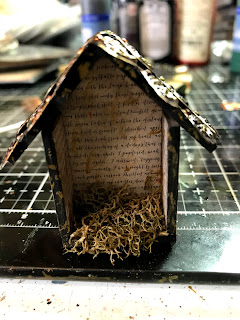
Assemble your Tiny Shadowbox House. I always paint and paper my house before gluing it together. I painted all of the edges black and stippled on Prima Art Alchemy in Brass Hardware, Dina Wakley Paint in Gilt, and Mowed Lawn Distress paint. The inside of the house has patterned paper from Authentique that I inked up a bit using Pumice Stone Distress Ink.
The roof of the house was made using the Tim Holtz mini provincial 3d impresslit and some gold paper. Once the paper was embossed I colored it using alcohol inks(latte, mushroom, meadow, and caramel).
I added a teeny bit of moss to the floor.
To make the ribbon tails I used muslin.
Using archival inks I stamped the muslin(Tim Holtz Stampers Anonymous stamps sets(CMS198, CMS306, CMS275, and CMS311) and added color using spray stains. The edges got a bit of Distress Crayon(Walnut Stain and Black Soot) and bit more Prima Art Alchemy metallic paint. Once they were dry I just glued them to the back of the ribbon.
Glue the Small Swirl Medallion to the center of the ribbon. Then glue the Tiny Shadowbox House to the center of the medallion. Add in your teeny paper doll witches( I tinted one green) and add a Halloween Quote Token. I used a teeny brad and pushed it right into the base of the house to hold the quote token in place.
Your ribbon is finished and ready to wear.
Happy crafting,


Jess, your prize ribbon is so awesome! I love the way you have used the dresden type trim on the house roof and the stamped ribbon is a fabulous idea! Still haven't decided, good witch or bad, but I am rooting for the good! I always love seeing your creations!
ReplyDeleteJess, you always make the most unusual things, and this one just is so durn fun! I can just picture wearing this on Halloween! I love the house and medallion! So perfectly creepy and a great place to house those witches! Thank you for sharing your artwork with us at Frilly and Funkie! Hugs!
ReplyDeleteWhat a fun Halloween project. Love the big rosette and the little house with the witchy occupants are a great addition. Thanks for joining us at Frilly and Funkie.
ReplyDeleteHugs!
Cec
Enchanting! Love the tiny house of witches framed by the lovely rosette! Thanks for playing along with us at the Haberdashery challenge on the Frilly and Funkie Challenge Blog!
ReplyDelete