Monday, December 18, 2017

Christmas House Ornaments

Hi Everyone,


I've got a quick last minute ornament or gift tag for you.
Start with your Simple House Ornament cover both sides in the paper of your choosing. I added a bit of shimmer using my clear shimmer pen.  I tried to capture it in the photos, but it's so subtle.  

Apply a thin layer of white acrylic paint to both sides of your Snowflake Border.  You won't need the whole border.  I placed mine on top of my ornament and got a basic placement idea and then trimmed it accordingly.  
Once your paint is dry emboss the snowflakes using Fractured Ice Embossing powder. 


Color your Tim Holtz paper doll using Distress Markers.  I also added some stickles for sparkle. 
Glue your snowflakes to your house(be sure you don't cover the hole in the top of the ornament).  Add your people using some foam tape for dimension.  Add stickers from the Tim Holtz Christmas clippings stack.  A little bakers twine and your ornament is finished.   


I liked this so much I made a second ornament using the same process, but these snowflakes are embossed with Charred Gold.The paper doll had a tiny jingle bell added to his hand.
Have a very Merry Christmas,
try it on Tuesdays- Twinkle, Twinkle
A Vintage Journey- Winter Wonderland
Mixed Media Monthly- Challenge 43


Sunday, December 17, 2017

Dashing through the snow

Hi Everyone,
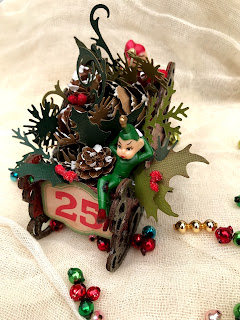
I have the cutest little sleigh ornament for you today.

I started with my slight ornament from Gypsy Soul Laser cuts.

Paint all of the solid pieces using red acrylic paint.  

Emboss the fancy edge pieces using Charred Gold embossing powder. 
Cover the solid slight pieces in Fractured Ice embossing powder and then glue on the fancy gold parts.  The sleigh has slots and tabs, making it easy to assemble.  I always assemble my pieces together before I start any project so I can be sure I assemble them correctly when I am done embellishing them. 
Another great tip- if you emboss a lot you need to invest in one of these Embossing Daubers.  They are amazing!
Cut out a bunch of greenery using the Tim Holtz Holiday Greenery Die.  Then cut out several pinecones using the tattered pinecone die.
Add grit paste and Soft Fallen Snow Embossing Powder or Distress Rock Candy Glitter to add snow to your pinecones. 
There are several pieces from the Tim Holtz Christmas Ephemera pack that fit right in the front of the sleigh. You could also cut a piece of paper to fit and stamp out names if you would want to use these as place card holders.   I chose the vintage pricing sign and aged it using Vintage Photo Distress Ink. 
Color several Beaded Berry Stems. I used Candied Apple Distress Stain to color mine.  
Once all of your greenery, pinecones, and berries are ready you fill the sleigh.  
I added the vintage elves to the sleigh for my finishing touch. 
Look at the sparkle from the Fractured Ice!
This little guy is hanging on tight!
This little guy is relaxing.  
Here's a little aerial view so you can see how everything is just tucked in to fill the sleigh. 

Happy Crafting!

Wednesday, December 13, 2017

Joy ornament


Hi Everyone,
Do you remember trying to take family photos and being told to smile over and over? I think these kiddos have had enough.  I just love the grumpy faces and then giving them silly headgear.  
The oversized tart tin was a perfect place to perch these grumpy guys.  
I'll be back soon with more Christmas makes!
Jess
Frilly and Funkie- Most Memorable Gift (one of my most memorable gifts was a bike. The look on these guys faces sums up my feelings on a bike). 

Monday, December 4, 2017

Merry and Bright Lantern

I'm up on the Gypsy Soul Laser Cuts blog today with a Christmas Lantern.


I have to admit I had one idea for this lantern and it turned into something completely different.
I started by assembling the lantern, just to be sure I was doing it correctly and so I would know what I would need to paint.
I disassembled it and started painting.
This is a really heavy duty chipboard and paint doesn't absorb into it like it does with thinner chipboard.  I did not put down a layer of gesso. I just went right in with a thin layer of black acrylic paint.  The entire piece was covered.  Once the black was dry I stippled on metallics.  I used Dina Wakley Paints in Gilt, Ancient, Penny, and Sterling.
To decorate the top I used the snowflake border from the Winter Shape Set.  Two snowflakes fit perfectly on each side of the top.  The snowflakes got a quick coat of silver paint.I wanted to add glitter, but didn't want to deal with using glue to make the snowflakes tacky. I decided to run them through my Xyron sticker maker on the painted side.  I added a clear glitter and had very little mess.
The snowflakes were glued to the top.


Here's where I changed my mind.  I decided I wanted to make this look like an actual lantern and not a winter scene inside the lantern like I had originally planned.  I took plain tissue paper and Tim Holtz's Frosted Film to line the inside of the panels.  Vellum would work too, but I like the frosted film because it gives an icy look and feel.  I did not attach the one side that isn't notched so you can add a flameless candle inside to make it look like a real lantern.

Grit paste with glitter sprinkled on top made the snow on the lantern.  The top was covered with grit paste and my pieces were stuck in while it was still wet.
The santa was colored using acrylic paint and then aged using alcohol inks.  The deer were aged using alcohol ink too.  The berries on his neck are old mercury glass that I colored using alcohol ink.   

The front of the lantern has the Tim Holtz Holiday Wreath that I stuck some extra greeny into and then added some frosted berries.  The big bow is from the fold up bow die.  The bells are from the new ideaology assortment. The sentiment is from the holiday chip quotes. 
This thing is really hard to photograph!
Happy holidays!


Disclaimer Notice

I've received products/compensation as part of the Gypsy Soul Laser Cuts Design teams. My projects, however, are 100% my own.