Friday, October 26, 2018

Son of a Witch!

Hi Everyone,
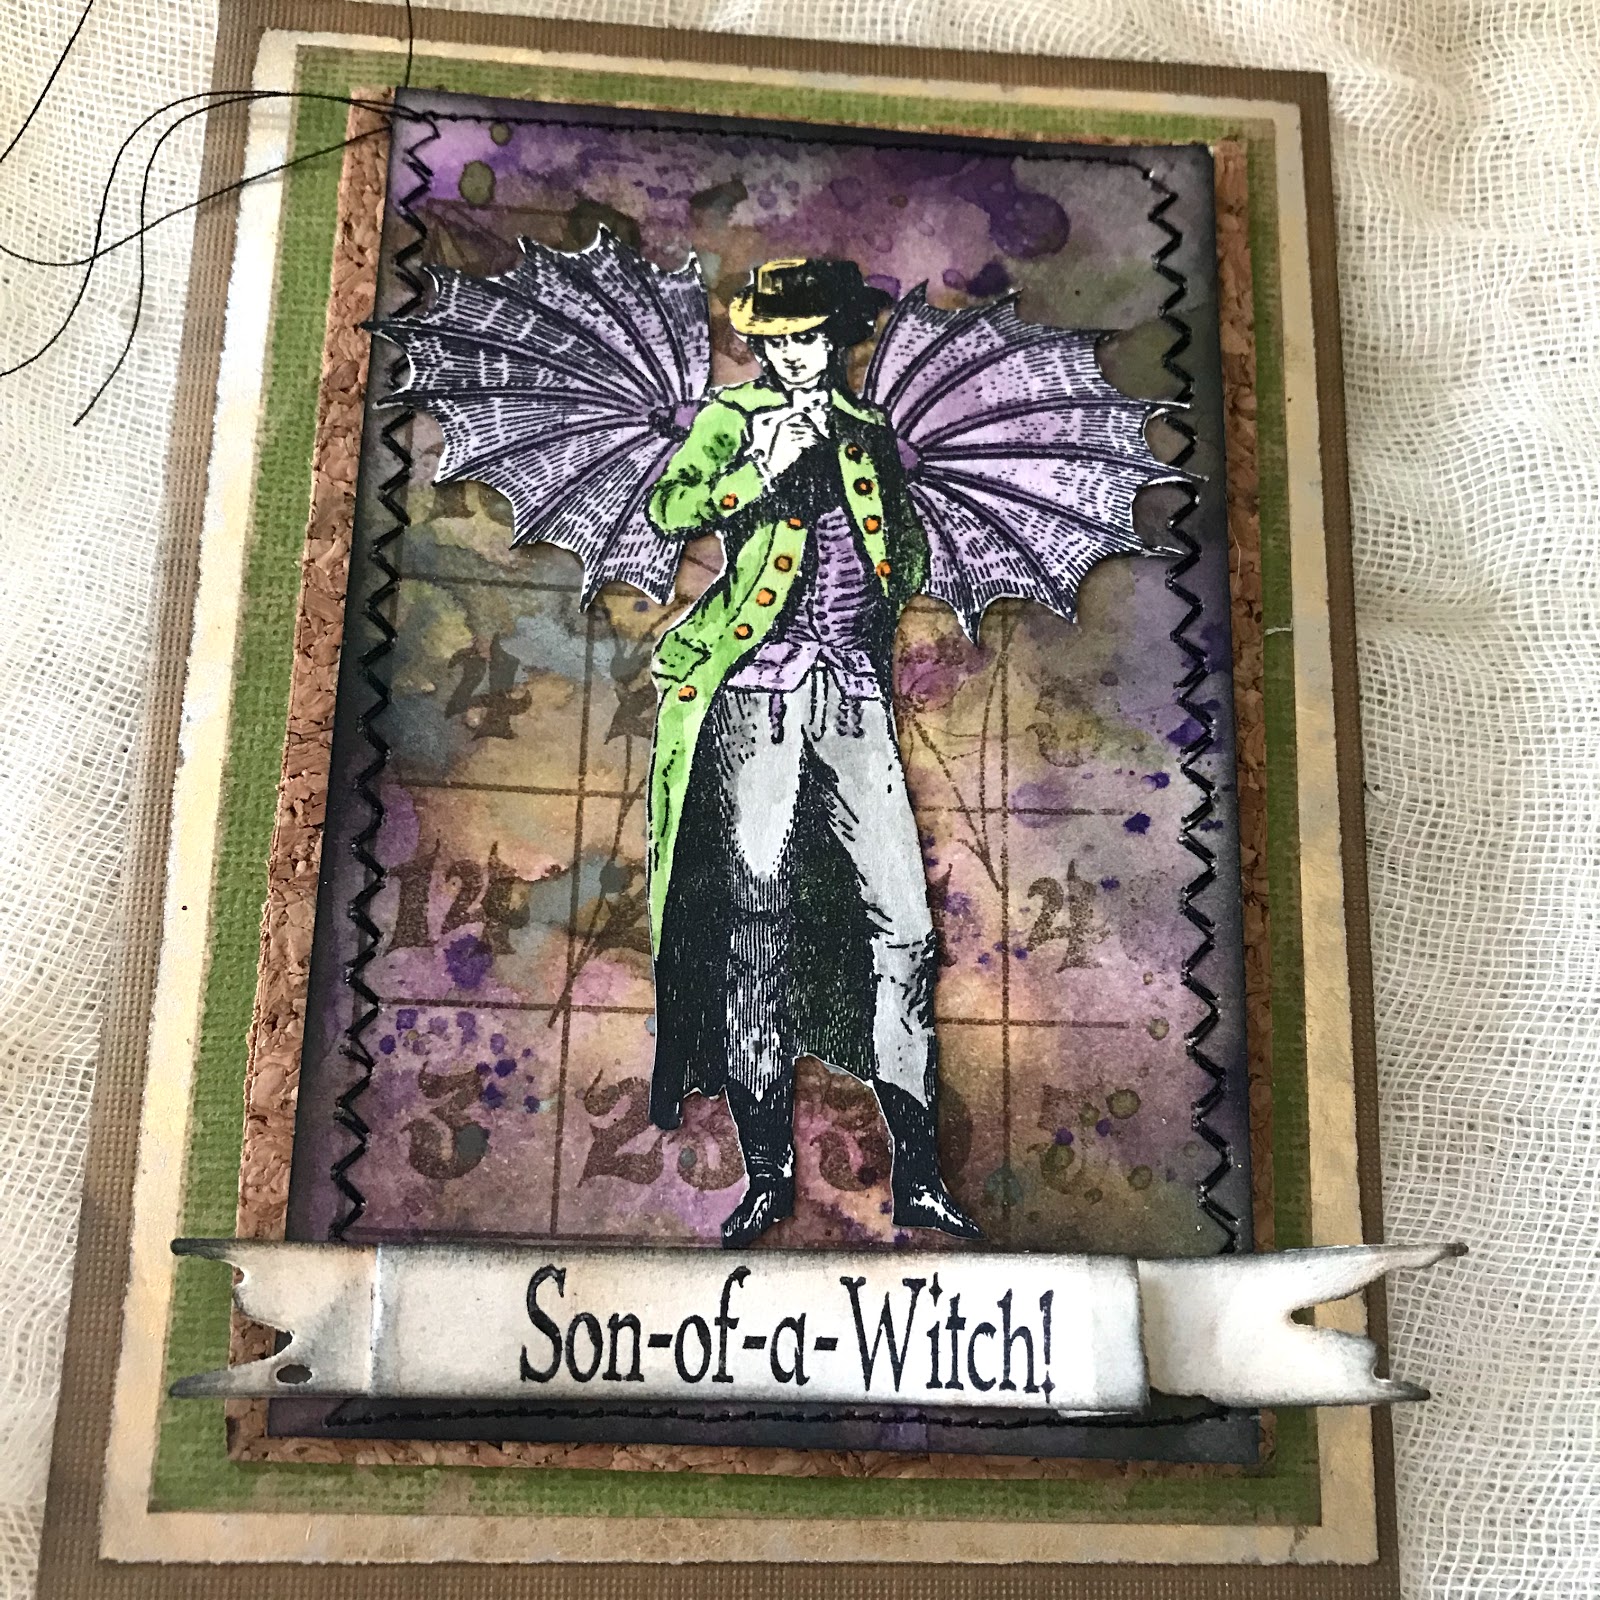
I am up on the Blank Page Muse blog today with this grungy Halloween card. 'Tis the season for witches, but let's not forget the Warlocks! This dapper Steampunk dude just screams Halloween to me.


On your craft mat smoosh on the purple shades of  Distress ink and run your Distress Mixed Media Heavystock paper through so the entire surface is covered. Wipe your ink up( wipe ink up between each layer)  Dry the base layer and smoosh more purple on the craft mat to get splats and dots. Dry this layer.

 Smoosh greens on the craft mat and tap the paper into the ink.  Don't rub or you'll get mud.  Dry the greens.

Smoosh on Hickory Smoke Oxide ink and tap the paper into the ink.  Let this layer air dry.  It's important to let the Oxide air dry to get the oxide effect.
Stamp the Halloween Bingo Board on the background using Coffee archival ink.  Edge the paper with black soot DIstress ink.  Stitch all around the edge of the cardstock.
Using the Tattered Banner Die cut out the banner and stamp on the Oh, Son-of- a-Witch stampin Jet Black Archival Ink.  You can alter your stamps by either not inking the word or snipping the saying apart.  For this card the "oh" wasn't used.  Stamp the saying onto the banner. Ink the banner using Black SOot and Pumice Stone Distress Ink  Adhere the banner to the bottom of the background. 


Stamp the Steampunk Gentleman on heavy watercolor cardstock.  Color in the gentleman using a waterbrush and Distress Markers (Hickory Smoke, Dusty Concord, Mowed Lawn, Dried Marigold, Antique Linen, and Mustard Seed)  Cut out the gentleman and then ink all the edges with black soot ink.  Glue the Steampunk Gentleman to the background.


The rest of the card is just layered up with various cardstocks.


I hope you like my Steampunk warlock!
Happy Halloween,
Jess


Monday, October 15, 2018

Greetings from Regions Beyond


Hi Everyone,

I am up on the Gypsy Soul Laser Cuts Blog today with a wicked little vignette box.
Start by taking a wooden vignette box and layering it on top of your Mini Botanical Journaling Block.  The blocks come in a set of three, so you can play with different sizes.
Cut the house out of the Haunted House Oval.  Trim it down so it fits inside the vignette box.  Emboss the piece with Emerald Creek's Mercury Rising embossing powder.

Treat the outside of the box using Distress Oxide inks in Forest Moss, Hickory Smoke, and Ground Espresso. 

Add a crackle medium.  I really glopped it on so it looks chunky. Mixed with the Forest Moss Oxide ink the box looks a bit moldy.  Moldy is good at Halloween time!

Add paper to the back of the box and glue it in place.  Glue the house to the background.  Add fabric tape all around the edges of the shadowbox and set it aside. 
Use the largest of the Mini Botanical Journaling Blocks and cover the entire piece with gesso.
Add your sentiment cut from the Tim Holtz Halloween script, Christmas Script, and Holiday Words.  
Time to start adding Distress Crayon.     
Add crayon and move it around using your fingers.  
Cover the front using the same technique.  Add more saturated colors on the flowers and leaves. A bit of Distress Paint in Tarnished Brass gets smudged all around the edge of the block. 


Cut the bats and moon out of the Haunted House Oval.  Emboss the bats using the mercury rising powder.  Emboss the moon using Charred Gold.  


Glue the shadowbox to the center of the journaling block.  Add the bats to the front of the box.  Glue in a Tim Holtz tombstone with rub ons added.  Glue on the paperdoll.  Don't forget to give her a bouquet of dead flowers wrapped in mummy cloth. Cut a small slit around her hand and she appears to actually be holding the bouquet.

Make a bunch of tiny tattered florals and glue them in a cascade on the top of the vignette box.  A bit of leftover mummy cloth from the bouquet was put to good use up here.  A tiny skull bead aged with mushroom alcohol ink adds an element of surprise. 

Add a wooden finial that has been painted with Black Soot Distress Paint and a bit of Tarnished Brass. A bit of fabric tape that is around the edge of the box is wrapped around the finial.  Mummy cloth and a few more flowers complete the base. 
Here's the back of the Mini Botanical Journaling block all done up.
Happy Haunting!
Jess


Haunted Halloween  Challenge Frilly and Funkie


Wednesday, October 10, 2018

Spooky Bookmarks

Hi Everyone,
I'm up on the Blank Page Muse blog today with a little something to keep your page when your book gets too scary to read at night!


Stamp your bookmark(the bookmark is a Ken Oliver Watercolor bookmark) with your Ashes of Ex-Lovers BottleMummy Ribs Bottle, and Powdered Cobwebs Pot.  Using your permanent inks, stamp each bottle in a different color and at various angles to create interest. 

Once the inks are dry use Distress ink in Carved Pumpkin and Black Soot to cover the entire bookmark.

 Layer your bookmark onto various colors of cardstock. 
Punch a hole in the top of the bookmark.  Add your die cut Halloween Side Order skeleton images, Halloween Script Words, and your sari ribbon.


For the second bookmark the paper layering will be the same.  Using the permanent ink stamp your Oct. 31 and Spider from the Halloween Bingo Set.  Add in the tiny 31 to fill in the gaps.

  Once your ink is dry create your background.  Cover the entire bookmark using Shaded Lilac Distress Ink.  On your craft mat smoosh on the other two purple shades (Dusty Concord and Wilted Violet)  and spritz with water.  After your have sprayed your water tap your bookmark in the color.  Be sure you only tap it in a couple times.  If you just rub it around you won't get speckles and splats.  Look at your bookmark and see if you like the patterns that are appearing.  If you do, stop and dry your layer.  Once the layer is dry then you can go back and tap into the ink again.  Drying between layers makes a huge difference.

Add on your Frankenstein die cut image.   

Spray your sari ribbon, with Dylusions Lime and Distress Walnut Stain, and dry it.  Add the ribbon to the top of the bookmark.
I hope you're inspired to create some on your own.  They are easy and fun to make!
Happy Crafting,
Jess


Monday, October 1, 2018

Halloween Surprise Box

Hi everyone,


I am up on the Gypsy Soul Laser Cuts blog today with a tiny Matchbox Theater.  I absolutely love how this turned out and I hope you do too.

The theater has two pieces, start with the exterior piece first (the box).
Paint all of the outside seams with Black Soot Distress Paint.  Cover the box with paper from the new Halloween Paper Pad from Tim Holtz.  Watch your cuts so you can line up the pattern.  Using your Xyron Sticker maker adhere all the paper to the box and glue it together.

Emboss two pieces from the Circle Doily Set.  The outer circle was embossed using Emerald Creek's Mercury Rising.  The inner circle used Candy Orange.  The candy orange is super bright, almost fluorescent, so I toned it down using Mushroom Alcohol ink.  
Cut out the kitty from the Halloween side order and attach her to the doily.  Attach the doily to the top of the matchbox. 
Now it's time to work on the interior. 


Paint the interior piece of the theater except for the back panel.  Cover the back panel with Halloween Paper.  

The rest of the interior box was stamped using the Web stamp from an older Tim set(CMS093) and emboss using Emerald Creeks Hammered Metal.  At this time you can glue your box together.

Stamp, color, and die cut your witch from the Michael's exclusive set.  
Create a wobbler for the witch head.  Using a 1/2 inch circle punch cut out two circles.  Wrap a thin gauge wire around a marker a few times and snip it so you have a tiny spring.  Tape the edge of the spring to one of the circles and repeat for the other side.   
Using strong adhesive attach your witch to the wobbler. Make sure the depth of the wobbler works.  You don't want the witch to get caught when you're trying to open the box.  I added some halloween rub ons to the front of the interior box. 
Check it out! 


She's so fun.


The interior box just slides inside the wrap and you're done!
Enjoy!! 

Jess


Disclaimer Notice

I've received products/compensation as part of the Gypsy Soul Laser Cuts Design teams. My projects, however, are 100% my own.