I'm up on the Gypsy Soul Laser Cuts blog today.
It's almost time for the Easter bunny to hop by and leave us some candy. We always go to my sister's house for Easter dinner so I thought I would make her a little home decor piece.
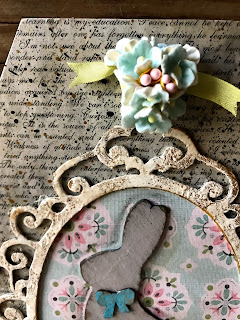
I started by using the Build a Layout Easter Set. The frame was painted with Deco Art Crackle Paint and then I rubbed Antiquing Cream in the cracks. I didn't like the sheen on the paint so a layer of Collage Medium made it matte.
The largest bunny was painted with Dina Wakley's Elephant and then sanded so it looks like it's been around for a bit. The bow tie was painted with Sky Blue and sanded as well.
The small eggs were embossed using the Tim Holtz Impresslits and 3d Embossing folders(Medallion andimpresslit, Kaleidoscope and Botanical 3D folders). Once they were dry I painted them using Dina Wakley Turquoise and Lemon. The Lemon Egg was toned down a bit with a layer of ELephant Paint. The third egg was painted using Victorian Velvet Distress Paint. Each of the eggs were sanded to reveal the raw chipboard and a layer of Walnut Stain Distress Ink finished them.
The nest is from the For the Birds set. The base is painted with Dina Wakley Gilt and the top is painted with Distress Vintage Photo Paint. I couldn't see much of the gold peeping through as I wanted so I added a tiny bit of gold foil to the top layer of the nest.
I measured how how the frame sat on one of the Super X tags and decided to bend the bottom three inches of the tag to create a base. If you score the chipboard you can gently bend the tag until it makes a 90 degree angle.
I covered a Super X tag with a patterned paper. Then splattered on Black Soot Distress Paint and Dina Wakley Gilt. Behind the fame there is a piece of Tim Holtz's Worn wallpaper. The frame and wallpaper were glued directly to the tag base. The bunny and eggs were glued down next. The nest was attached using foam tape since the bunny and eggs were rather thick and I didn't want the nest to bend. Distress Crayon in Hickory smoke added a grungy halo around the bunny.
Moss was glued to the entire base and then the two bunnies that are part of the banner from the Build a Layout Easter Set. were added. They were painted and sanded the same way as the large bunny. Vintage flowers and some old plastic craft eggs were added to complete the base.
A tiny bouquet of vintage flowers were added to the top of the tag.
I hope you have a very Happy Easter!
Jess
Simon Says Stamp Beautiful Blossoms Challenge


I love your Easter tag! The colors are wonderful and the textures on the eggs look amazing! Wishing you and your family a happy Easter Jess!
ReplyDeleteA very pretty Eastertag made with lot of fantasy. So romantic.
ReplyDeleteHappy Easter to you and your family.
Greetings
Sabine
beautiful creation with so much gorgeous detail and texture, thank you so much for sharing with us at Simon Says Stamp Monday Challenge, hugs kath xxx
ReplyDelete