Showing posts with label 3d impresslits. Show all posts

Monday, August 12, 2019

One can be both weird and fabulous

Hi Everyone,
I know it's been quiet on the blog, but I do post a bit more on Instagram if you want to follow me over there.

 I have been really into creating oversized cards lately.  This one measures just over 5x7.  I started with a piece of precut mixed media heavy stock and used Distress Oxide Sprays in Peeled Paint, Abandoned Coral, and Peacock Feathers.
I misted the paper first to get the blend.  Once that was dry I added a bit of Frayed Burlap ink to the edges.  The Oxide colors mixed and made a bit of brown,  so the touch of Burlap really tied it together.  I used a bit of embossing powder and a stencil from the Studio Light Grunge Collection to add the yellow numbers in the background.

 It's pretty cool that they blend in even though I didn't use any yellow for the original background colors.  I went back in with the stencil and using Distress Ink in Brushed Corduroy added more of the numbers.  I finished the background with a touch of DecoArt Metallic Lustre Paste in Brilliant Turquoise on the every edge of the paper.


The focal image is from the Steampunkesque set from IndigoBlu.  I stamped the lady using Black Soot Archival Ink and then colored her using Distress Inks and my waterbrush.  I added glossy accents to the glasses and light bulb.  Once everything was dry I fussy cut her and added a halo behind her using a 3d impresslit.

I had to position her on the paper to see how I wanted to add my sentiment and just decided to stamp it right on the background using Black Soot Archival ink.  The ink goes right over the embossing powder.  I used my stamp platform to be sure I got a good dark image.  The sentiment stamp is also from the Steampunkesque set.

To complete the card I used used plain brown card stock and a couple sheets of Distress cardstock.  A bit of scribbling with my gel pen in random spots made it feel finished.


I hope you enjoyed my card.

Happy crafting,
Jess

Monday, June 24, 2019

Land of the Free

Hi Everyone, I am posting my final project as a guest designer for the Simon Says Stamp Monday Challenge.  I hope you have enjoyed my projects as much I have enjoyed making them.

This week's theme is Stars and Stripes!


Today I have made a little home decor piece for you.  I started with a mini Tim Holtz Etc tag and covered it with paper from the Correspondence paper pad.  I used collage medium to adhere it to the tag and another coat on top.  Once the collage medium was dry I spattered on some Black Soot Distress Paint nand made some scribbles using a white gel pen.  A little bit of Vintage Photo Distress Crayon added some shading to the edge of the paper.
I spritzed some of the Tim Holtz Christmas Fringe with Tarnished Brass Mica Spray and glued it to the edge of the tag.

To create the center panel I used a vignette panel and covered it with paper.  I used the collage medium again underneath and on top of the paper.  Once again I added black and white details using the paint and gel pen.
Using metal tape I made several lengths of the Mini Provincial 3d Impresslit.  I painted them white and then used Distress Crayon in Walnut stain and Vintage Photos to grunge it up a bit.  I also pounced on a bit of Mushroom Alcohol Ink.  I removed tha backing from the paper and stuck the tape around the edges of the panel creating a frame.  I glued the panel to the center of the tag.

The paperdoll was given a coat of clear gesso and then I added Distress Marker in Faded Jeans and Festive Berries to give her a pop of color.  A teeny star was added to her sash for some bling.  A metal star was added to the top of her flag.   She is popped up on the panel using foam tape.

The stencil chip was painted with Dina Wakley Media Paint in Ancient.  While the paint was still wet I dripped on alcohol ink in Mushroom and Patina.  Because the paint was still wet it looks like it corroded the metal.  A vintage ticket was layered underneath and then the chip was glued down using foam tape.

I used letters from the Tim Holtz Halloween typography set to make the word "free.'  I  sanded the letters and painted on some Tarnished Brass Distress Paint, then wiped it off before it was totally dry.  I used collage medium to glue the letters to the panel.

A flashcard from the Tim Holtz Elementary was added to the bottom of the panel.  The card was dinged up a bit by running it along the side of my media mat.  I added some Tarnished Brass Distress Paint to the edges and glued it down using collage medium.

The clip on top was coated with clear gesso and then alcohol ink in mushroom and patina was added to age it.   A large star completes the clip.

I hope you were inspired to enter the challenge or at least bust out your supplies and make! Have a happy and safe Fourth of July. 
Happy crafting,
Jess


As always Simon Says Stamp will be giving away $50 voucher to shop at the fabulous Simon Says Stamp Store


Do you use Instagram ?  If so please add  #sssmchallenge so we can see your entries there too


You have until Monday 8am Ohio time. 1pm UK time, 2 pm CET to join in 

All of the products I used on today's project that are available from Simon Says Stamp are linked below.


Tim Holtz Christmas Fringe
Tim Holtz Mini Etc Tag
Tim Holtz Vignette Panel
Tim Holtz Mini 3d Impresslit Provincial
Tim Holtz Stencil Chips
Tim Holtz Elementary Flashcards
Tim Holtz Halloween Typography
Tim Holtz Paperdolls
Tim Holtz Vintage Clips
Tim Holtz Paper Pad Correspondence
Tim Holtz Faded Jeans Distress Marker
Tim Holtz Festive Berries Distress Marker
Tim Holtz Collage Medium
Tim Holtz Alcohol Ink Mushroom
Tim Holtz Alcohol Ink Patina
Tim Holtz Distress Oxide Spray Walnut Stain
Tim Holtz Distress Crayon Vintage Photo
Tim Holtz Distress Crayon Walnut Stain
Tim Holtz Distress Paint Tarnished Brass
Tim Holtz Distress Paint Picket Fence
Tim Holtz Distress Paint Black Soot
Tim Holtz Mica Spray Tarnished Brass
Tim Holtz Star Adornments
Uni-Ball Signo White Gel Pen
Prima Clear Gesso
Dina Wakley Media Paint Ancient
Dina Wakley Media Paint Umber

Monday, April 15, 2019

Easter Greetings

Hi Everyone,
I'm up on the Gypsy Soul Laser Cuts blog today.

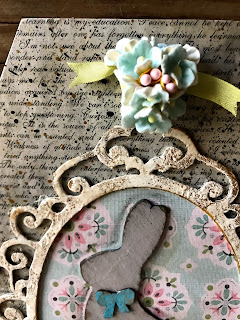
It's almost time for the Easter bunny to hop by and leave us some candy.  We always go to my sister's house for Easter dinner so I thought I would make her a little home decor piece.

I started by using the Build  a Layout Easter Set.  The frame was painted with Deco Art Crackle Paint and then I rubbed Antiquing Cream in the cracks.  I didn't like the sheen on the paint so a layer of Collage Medium made it matte.

The largest bunny was painted with Dina Wakley's Elephant and then sanded so it looks like it's been around for a bit.  The bow tie was painted with Sky Blue and sanded as well.
The small eggs were embossed using the Tim Holtz Impresslits and 3d Embossing folders(Medallion andimpresslit, Kaleidoscope and Botanical 3D folders).  Once they were dry I painted them using Dina Wakley Turquoise and Lemon.  The Lemon Egg was toned down a bit with a layer of ELephant Paint.  The third egg was painted using Victorian Velvet Distress Paint.  Each of the eggs were sanded to reveal the raw chipboard and a layer of Walnut Stain Distress Ink finished them. 


The nest is from the For the Birds set.  The base is painted with Dina Wakley Gilt and the top is painted with Distress Vintage Photo Paint.  I couldn't see much of the gold peeping through as I wanted so I added a tiny bit of gold  foil to the top layer of the nest.   

I measured how how the frame sat on one of the Super X tags and decided to bend the bottom three inches of the tag to create a base.   If you score the chipboard you can gently bend the tag until it makes a 90 degree angle.

 I covered a Super X tag with a patterned paper. Then splattered on Black Soot Distress Paint and Dina Wakley Gilt.  Behind the fame there is a piece of Tim Holtz's Worn wallpaper. The frame and wallpaper were glued directly to the tag base.  The bunny and eggs were glued down next.  The nest was attached using foam tape since the bunny and eggs were rather thick and I didn't want the nest to bend.   Distress Crayon in Hickory smoke added a grungy halo around the bunny.
Moss was glued to the entire base and then the two bunnies that are part of the banner from the Build  a Layout Easter Set. were added.  They were painted and sanded the same way as the large bunny.  Vintage flowers and some old plastic craft eggs were added to complete the base.
A tiny bouquet of vintage flowers were added to the top of the tag.

I hope you have a very Happy Easter!
Jess


Simon Says Stamp Beautiful Blossoms Challenge

Monday, March 18, 2019

Spring toadstool fairy exploding canvas


Hi Everyone,
I'm up on the Gypsy Soul Laser Cuts Blog today.
The weather has been so nice here.  Flowers are blooming and pretty soon we will start seeing the baby ducks in our little neighborhood lake.  It's also the time of year when I start to make fairies.  Ah, who am I kidding I love to make fairies all year round!

A couple years back I made an exploding canvas and I totally loved the process.  I decided it was time to make a new one and this time I gave it a little twist.  I knew I wanted a tiny fairy so my canvas had to be small  too.
I started by covering a 5x5 canvas with Tim Holtz Collage paper.  I used collage medium to adhere it to the canvas and coated the top too.  I dried it with a heat gun.  Once the collage paper was dry I used texture paste and a flower stencil to add detail to the top and bottom corners.
I sprayed the canvas using Distress Oxide Spray in Peeled Paint, Vintage Photo, and Iced Spruce.
 I added paint splatter in black(Distress Black Soot) and gold(Dina Wakley Ancient).   I used Distress Crayon in Lucky Clover to enhance the texture paste flowers. At the end I decided to add a bit of Worn lipstick and Picked Raspberry Crayon to the flowers too. 
Once the paint was dry I flipped the canvas over and used a different collage paper to line the inside of the canvas.  I blasted it with the heat gun and then cut the canvas up.  You can see the cut lines.  This is the scariest part of the whole process, but the outcome is fabulous.  
Before I started prepping my canvas I took the Mini Shadowbox set and put together a couple of the boxes I thought might fit into the frame.  Once I had one that fit right I started working on the canvas.  I didn't want to get this far into the thing just to discover that what I thought it would look like in my head would not work out at all. 
After the canvas was cut I glued the pieces to the front of the canvas creating an opening.  
For the hollow, I wound up using the smallest of the shadowboxes.  The fun thing about the box this size is that it doesn't take much paper to cover it.  I spritzed a manila tag with Worn Lipstick Oxide Spray and let it air dry.  The air drying seems to make it oxidize a bit better(it also could be my imagination).I gave it a quick mist of water on either side and ran it through my 3d Kaleidoscope  embossing folder.  This one tag covered the entire outside of my box with some to spare! I sanded the tag a bit and added some Distress Crayon in Gathered Twigs to highlight the raised areas.  
For an added detail I ran metal plumbing tape through my impresslit folder.I colored it using gold, latte, and caramel alcohol inks.   

I cut the manila tag to cover the outside of the shadowbox I used the faux dresden to cover the edges.  The edge of the dresden is the perfect size to cover the edge of the chipboard. 


The inside of the box was lined with paper and washi tape.  I really just wanted the little flowers to peep through in the back there.  I added some spun cotton toadstools, moss, and a teeny paperdoll.  The new Tim Holtz  wings work perfectly on this guy.  
To finish the canvas I colored seam binding using the Worn Lipstick Oxide spray and a bit of Tea Dye Distress Spray.  I made a fluffy bow and added a word band. In the top corner, opposite from the bow, I added a flower cluster with some additional moss.    


Happy Spring! 
Jess


Monday, September 24, 2018

Pockets full of inspiration

Hi Everyone,
I think most of you know I am a huge reader.  I love everything about books.  Remember when you used to have to sign out your books at the library by writing your name on the card in the pocket?  Today I have a project for you using library pockets.


Blank Page Muse Products:

Other Supplies:
Library Pockets
Paper Dolls
Photobooth Photos
Distress Inks
Distress Oxide Ink
Archival Inks
Adhesive
Chipboard Sentiments
Bronze Paint
Vintage Sheet Music
Heavy weight thread
Milk Cap
Die Cuts
Mini flashcard
fabric tape
Frosted Crystal Embossing powder
Cardstock
Paper Distresser

Start by using a piece of silver cardstock. Coat the cardstock using Distress Ink and Oxide Ink ( I used rusty hinge and walnut stain).  Once the ink is dry use archival ink( Potting Soil) to stamp the  Small Crackle stamp.  Using a paper distresser rough up all the edges and cover the front of your library pocket.  
Stamp a piece of vintage sheet music with the postal stamp from the Correspondence  set.  Slide the paper into the pocket and glue it in place.  Add your 3d embossed border to the top of the pocket.  Stitch a small "x" onto your photo and glue it onto the crackled background.  Glue on the milk cap and chipboard sentiment. 
Stamp out the small Butterfly using archival ink.  Add bronze paint to the edges and cut the butterfly in half.  Add the wings to a paper doll and slide her into the pocket. 

This will complete your front cover. 


 Line a second pocket up to the backside of your first pocket.  Using a piece of fabric tape attach the pockets together.  Line the backside of your first pocket with a vintage airmail envelope.  Use postage stamps from the Correspondence  set in various spots.
Using Jet Black archival ink stamp a Hot Air Balloon.  Color the balloon using various shades of blue distress ink.  Fussy cut your balloon and use the bronze paint to cover your raw edges.
Adhere the balloon to the page.  Add a paper doll, chipboard sentiment, and die cut globe (from the Sizzix side orders).  Using the smallest  of the Feathers stamp them all around your page.  

   Use patterned scrapbook paper to cover the pocket on your next page.  Add the Pointing Hand and Feathers to the top of the pocket.   

Use the   Small Crackle stamp to add age to a tiny flashcard.  Use bronze paint around the edges. 
Add paper doll with die cut suitcase into the pocket. The suitcase is from the Sizzix Side order and was embossed using the Lumber 3d embossing folder. 
Here are the middle pages. 


For the back of the second page(your back cover), stamp on a plain piece of cardstock. Use the script stamp from the Correspondence  set, the  Small Crackle stamp, Sequin Waste, and the  Feathers.  I used various shades of archival inks in browns and reds to create my background.  Glue the paper to your pocket.  Rip a piece of patterned scrapbook paper and add it to the edge.  Stamp out a couple Feathers using archival ink and fussy cut them,  Add the tiniest hint of blue using distress inks to the feathers and edge in bronze paint.  Cut a small slit in your photo and slide the feathers in to make them appear to be wings.  Glue remaining pieces to complete your book.     
I hope you enjoyed this project as much as I enjoyed creating it.

Disclaimer Notice

I've received products/compensation as part of the Gypsy Soul Laser Cuts Design teams. My projects, however, are 100% my own.