Showing posts with label distress oxide. Show all posts

Tuesday, September 24, 2019

Boo to you!

Hey Everyone,
 It's been a bit since I have blogged.  I have been working my pay the bills job and doing some behind the scenes crafty work.  I hope you had a chance to catch the Stamptember Tim Holtz release on Facebook Live. I had a blast making samples for this release.  
This project might be my favorite.  
The turn around time for these projects was lightning fast so I didn't take any process photos, but I can walk you through my project. 
The treat bag was made using the Tim Holtz In the Bag die and some glittery black paper.  I just assembled it according to the instructions. 

 For the tissue, I used plain tissue wrap and Distress Inks.  I used Black soot Distress Ink, Carved Pumpkin and Wilted Violet Distress Oxides to make the stars.  The stencil included in the Stamptember set has two different star patterns.  I used the larger pattern(the more circular one) with the Black Soot and then the smaller pattern with the Oxides.  I cut the sentiment off my bat stamp.* Side note: Don't be afraid to cut your stamps!  Use a really sharp pair of scissors and go for it! If you can't commit then you could just ink the sentiment too.* The sentiment was stamped using black soot archival ink. The paper was tucked right inside the bag.  
I used the star stencil on a tag to make the black stars.  They are embossed with a glittery black powder to match the bag.  Once the embossing was done I used Ripe Persimmon, Carved Pumpkin, and Dried Marigold to blend the background.  A border punch completed the tag.  
The saucy little bat was colored using Distress Inks(Wilted Violet, Dusty Concord, and Seedless Preserves)  and a waterbrush.  She was stamped using Black Soot Archival Ink on watercolor paper and colored in. I stamped the wing again and colored it on both sides. Everything was fussy cut and attached to the tag.  
I left a long tab on the wing and stuck it to the back of the bat.  I creased the wing so it matched up with the other wing.  Now there is a fun interactive piece of the treat bag.  A little word band and paper twine finish it up.
Please pardon the background change on the photos.  We were working fast and furious to get these guys out the door.  My poor husband was my photographer, editor, and mail man for me!  He's a good doobie.  

I hope you like my creation!  These sets sell fast and once they are gone they are gone.  Go grab it before it disappears like Halloween candy does in my house.  
Jess


Monday, June 10, 2019

Adventure Awaits My True Friend


It's time for a new Monday Challenge!
The theme this week is Vacation!


I started by covering my vignette box inside and out with a thin layer of Picket Fence Distress Paint.  Once the paint was dry I used college medium to adhere the travel collage paper to the outside of the box.  A bit of Tarnished Brass Distress Paint was added here and there on the outside of the vignette box.
Using a piece of matching travel paper from the 8x8 etcetera pad, I glued it to the back the inside of the box.  I sanded the paper so the map appears aged and covered it with Pumice Stone Distress Ink.  The final touch was to splatter on some Black Soot Distress Paint. I snapped one of the ruler pieces in half.  I just held mine in my hand and snapped it.  I didn't want it to be even.  If you wanted an even cut you could cut it with your craft knife or even use a pair of Tim's scissors to snip it.  I wrapped the ruler in a piece of craft thread and added the compass charm.   I then glued the ruler inside the box about two thirds of the way down.


A couple clipping stickers were added to the top of the box.  I centered them so they would be above the baseboard doll's head.  Then outlined them using a gold paint pen.
The bottom part of the box has a vintage clock face.

The baseboard doll was colored using a Distress Crayon in  Cracked Pistachio.  The tiny flower was colored using Wild Plum alcohol ink and added to her hair.  Two sets of transparent wings were added to her back using foam tape.  The wings got a tiny bit of Wild Plum alcohol ink and some Tarnished Brass Distress Paint added to them.  I glued a little clipping sticker to her center and then I glued the doll to the box using several bingo markers to hold her upright.

The bottom of the box is covered with vintage paper flowers.


I covered the lace baseboard frame with crackle texture paste and let it air dry.  Once the crackle was dry I sprayed it with Distress Oxide Sprays(Pumice Stone and Cracked Pistachio). Some of the crackle flaked off and I was totally okay with this. The exposed areas suck in the spray and you get all that wonderful oxidization.

I took a ribbon from the Ideaology Ribbon and bow assortment and colored it using Tarnished Brass Distress Paint.  Before the paint is fully dry, I wiped some off to expose the metal underneath.
I used a chip quote and banged up the edges by running it along my desk.  The edges got a coat of Tarnished Brass Paint.

The finial was painted with Black Soot Distress Paint and then given a couple sprays of the same Oxide Colors I used on the frame.   The little grooves were painted using the Tarnished Brass Paint.

Using a strong glue I added the fence to the back of the frame and then glued the frame to the vignette box.
I hope you enjoyed my take on this weeks theme.  And now it's your turn to create a Vacation themed project!
Jess


As always Simon Says Stamp will be giving away $50 voucher to shop at the fabulous Simon Says Stamp Store


Do you use Instagram ?  If so please add  #sssmchallenge so we can see your entries there too


You have until Monday 8am Ohio time. 1pm UK time, 2 pm CET to join in 

Monday, November 26, 2018

Quiet, but not blind


Hi Everyone,
I have a great technique filled card for you today.  Let's jump right in!

Using Distress Heavy stock blend together several shades of Distress Ink (Scattered Straw, Squeezed Lemonade, Fossilized Amber, and Wild Honey).  Spritz with water and dry completely.  Take a tiny bit of Distress Micro Glaze cover most of the background.  Stamp the Floral Lace stamp using Vintage Photo Distress Oxide Ink and spritz with water.  Using the micro glaze on most of the background keeps the top layer of ink from blending into the background.  It also keeps some of the intricate stamp pattern, but not all of it.  The look is wonderfully aged and tattered.
Take clear texture paste and the Latticework stencil to the background.  Don't worry about it looking perfect.  Imperfect looks better! Once the paste is dry use the Forest Moss Distress crayon to scribble over the paste.  Smudge the crayon using your finger and the pattern pops up adding another layer to your background.
Stamp the Large Bird Man on Watercolor cardstock.  Color him in using a waterbrush and Distress Markers.  Once he is dry fussy cut the image.

To finish the background stamp your two sentiments( Oh darling  and I was quiet, but I was not blind) using archival ink.  Back them with black cardstock and play with placement on your background.  Once you're happy with placement you can glue them down.
Run plain black cardstock through your die cutting machine using the Botanical 3d embossing folder.  Take a Distress Crayon in Tarnished Brass and highlight the raised areas.  The slight gilded effect is so gorgeous.  Adhere this piece right under the focal background piece you created.
All that's left to do is layer up your background.  On this card the black is attached to a distressed piece of gold cardstock.  The gold is mounted to a sage green card.  A bit of burgundy ribbon was the finishing touch.

Happy Crafting,
Jess


Monday, November 5, 2018

Does the bell still ring for you?


Hi Everyone,
I have officially started my Christmas crafting!
One of my favorite Christmas stories is The Polar Express.  Today's project is a little nod to the book.

When I started this project I didn't think I wanted a tag as long as the Extra Large Tag (it's 8 inches long and 4 inches wide), so I cut off a big chunk.  Thankfully I saved the piece I cut off because as my project evolved I knew I needed it!
Start by painting the entire tag white and then stamping a line of music notes (from the special Tim Holtz Stamptember Set from Simon Says Stamp) all over the back using Distress Oxide ink in Hickory Smoke.  Then seal the ink using Distress Micro Glaze.  Once the micro glaze is on add Vintage Distress Collage Medium to the entire piece.  The thicker the glaze, the darker the color.
Next paint a piece of  Christmas Distress Collage tissue. The collage tissue is black and white, but it can be colored.  Pick the area you want to show and on the backside apply your paint.  The paint doesn't have to be perfect, but it shouldn't go too far outside the lines(unless that's the look you're going for).   I used Forest Moss, Peeled Paint, Victorian Velvet, and Vintage Photo Distress Paints to color my tissue.  
Once the paint is dry adhere it to the bottom of the tag.  The tissue blends in so well it looks like it was part of the background all along.  

Add a bit of Charred Gold embossing powder from Emerald Creek around the edge of the entire piece.  
Paint the Frame in Tarnished Brass Distress Paint.  Once it is dry add Deco Art's Crackle Glaze.  The glaze makes teeny cracks, like you see on old china.  When the glase is dry rub Distress Crayon in the cracks to make them pop.  Glue the frame to the tag. Using a bit of foam tape, add a piece of patterned paper inside the frame.  Color your paper doll and adhere her to the patterned paper(she's popped up with a bit of foam tape too). Add a tiny bell to her hand.    
The paper doll had a little paper tassel on her hat, but mine ripped off.  So to give her hat a makeover.  Color a baubble using Spun Sugar Distress Paint.  Once the paint is dry add a bit of mushroom alcohol ink to age it a bit.  You can see the tiny cracks in the frame a bit better here too.  

Using the Tim Holtz festive foliage die make a bunch of flowers to adhere to the corner of the frame. 

Now here is the part when I decided I wanted to add more to my tag.  My sentiment wasn't working the way I thought it would and it just needed more.  I took the part I had cut off earlier and glued it to the base creating a little shelf.  Color the fringe using spray ink and alcohol ink and glue it to the base.  
Paint a salvaged santa using Distress Paint and Alcohol inks.  Once the paint is dry rub Hickory Smoke Distress Crayon to pick up the nooks and crannies. Paint the deer using gold alcohol ink.  Glue them all to the base.
One the opposite side glue a bottle brush tree decorated with vintage mercury glass. 
I added the quote token to the top of the tag to finish it off.  
I hope the bell always rings for you. 

Have you started your Christmas crafting?

Friday, October 26, 2018

Son of a Witch!

Hi Everyone,
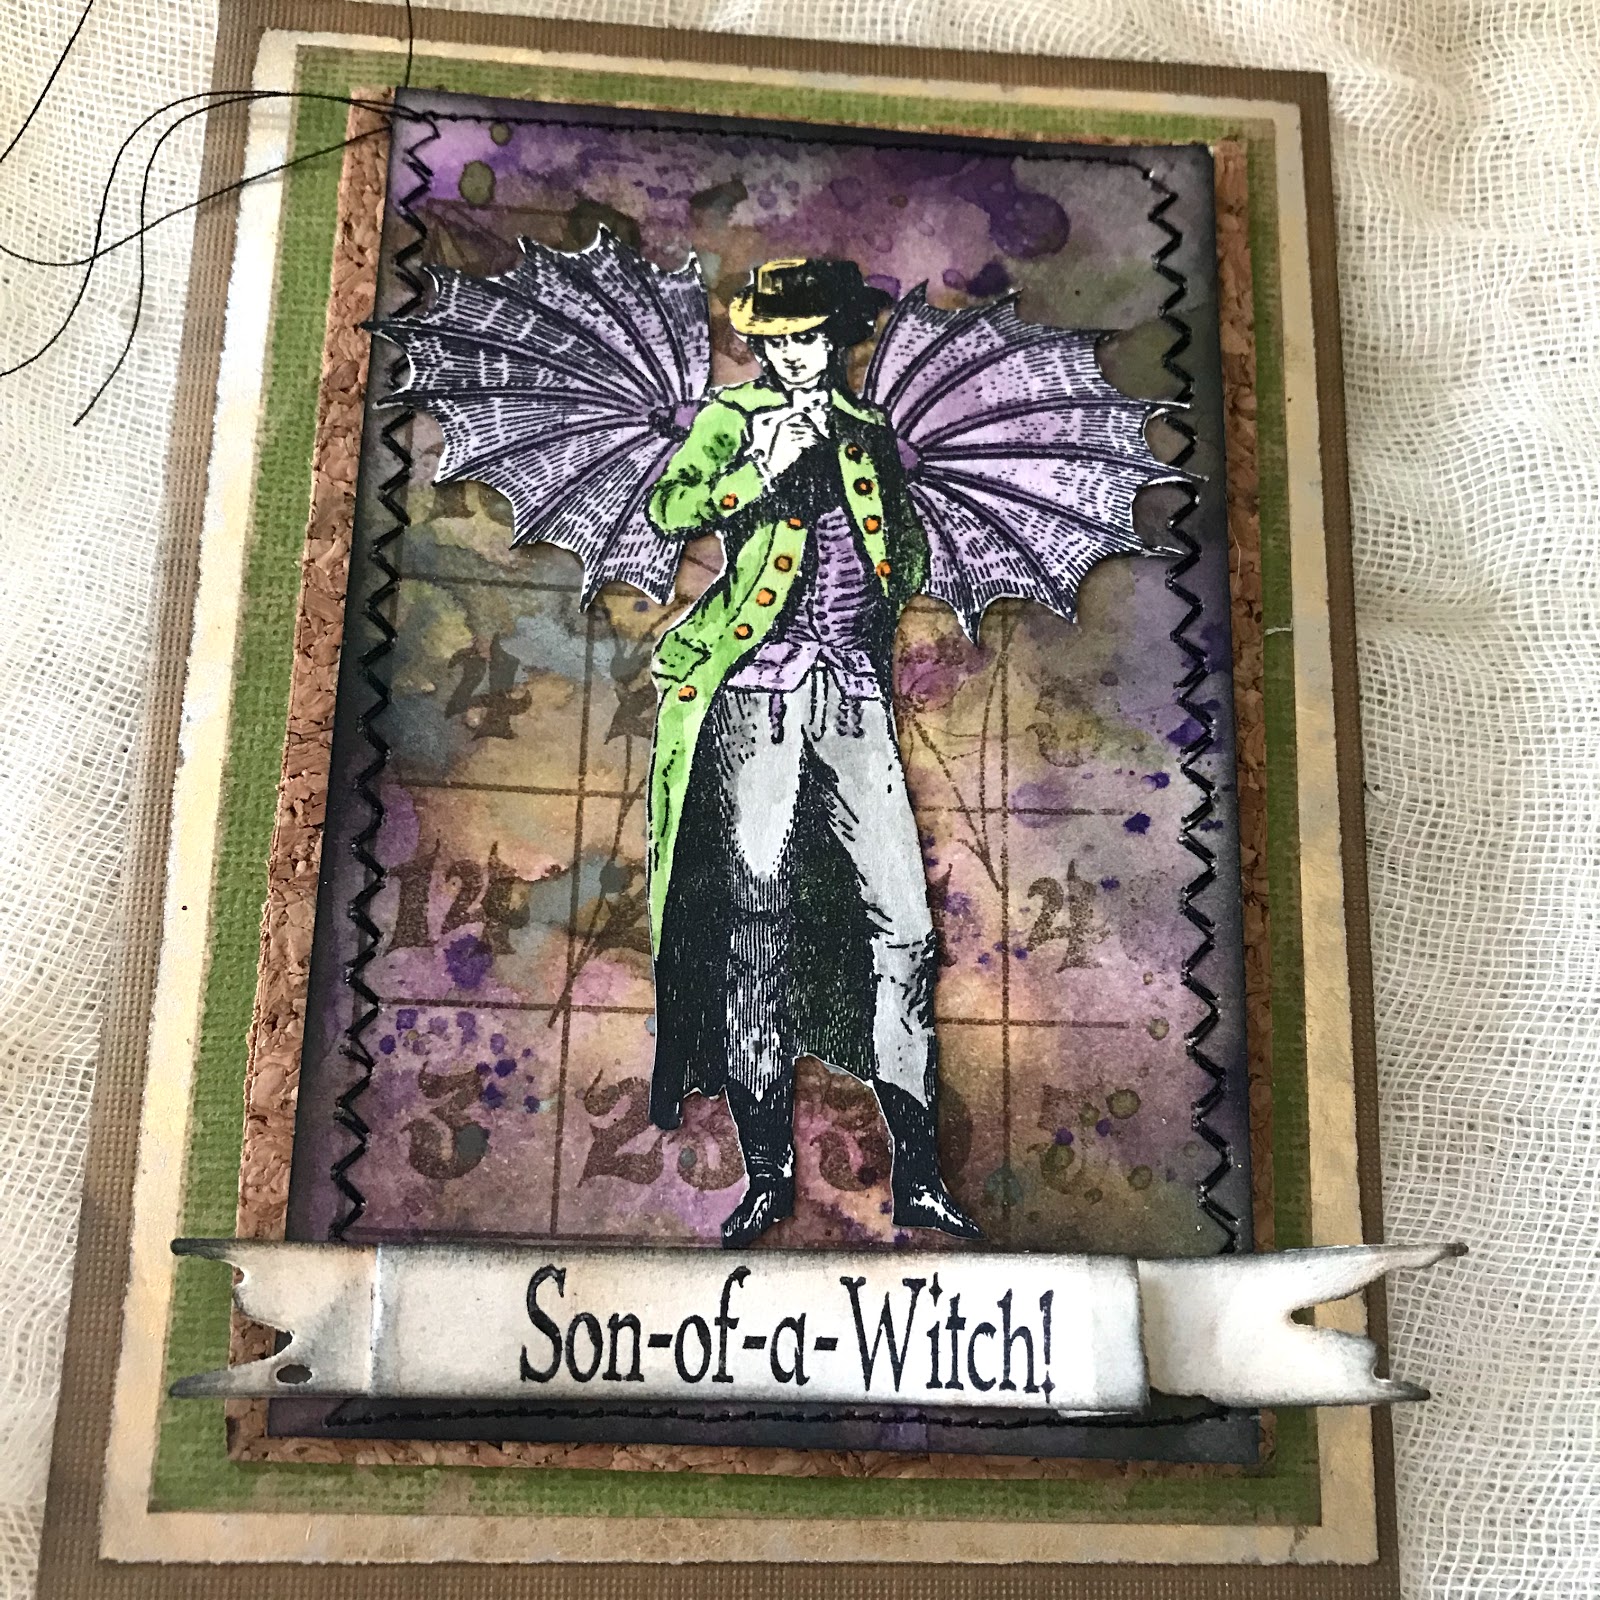
I am up on the Blank Page Muse blog today with this grungy Halloween card. 'Tis the season for witches, but let's not forget the Warlocks! This dapper Steampunk dude just screams Halloween to me.


On your craft mat smoosh on the purple shades of  Distress ink and run your Distress Mixed Media Heavystock paper through so the entire surface is covered. Wipe your ink up( wipe ink up between each layer)  Dry the base layer and smoosh more purple on the craft mat to get splats and dots. Dry this layer.

 Smoosh greens on the craft mat and tap the paper into the ink.  Don't rub or you'll get mud.  Dry the greens.

Smoosh on Hickory Smoke Oxide ink and tap the paper into the ink.  Let this layer air dry.  It's important to let the Oxide air dry to get the oxide effect.
Stamp the Halloween Bingo Board on the background using Coffee archival ink.  Edge the paper with black soot DIstress ink.  Stitch all around the edge of the cardstock.
Using the Tattered Banner Die cut out the banner and stamp on the Oh, Son-of- a-Witch stampin Jet Black Archival Ink.  You can alter your stamps by either not inking the word or snipping the saying apart.  For this card the "oh" wasn't used.  Stamp the saying onto the banner. Ink the banner using Black SOot and Pumice Stone Distress Ink  Adhere the banner to the bottom of the background. 


Stamp the Steampunk Gentleman on heavy watercolor cardstock.  Color in the gentleman using a waterbrush and Distress Markers (Hickory Smoke, Dusty Concord, Mowed Lawn, Dried Marigold, Antique Linen, and Mustard Seed)  Cut out the gentleman and then ink all the edges with black soot ink.  Glue the Steampunk Gentleman to the background.


The rest of the card is just layered up with various cardstocks.


I hope you like my Steampunk warlock!
Happy Halloween,
Jess


Monday, October 15, 2018

Greetings from Regions Beyond


Hi Everyone,

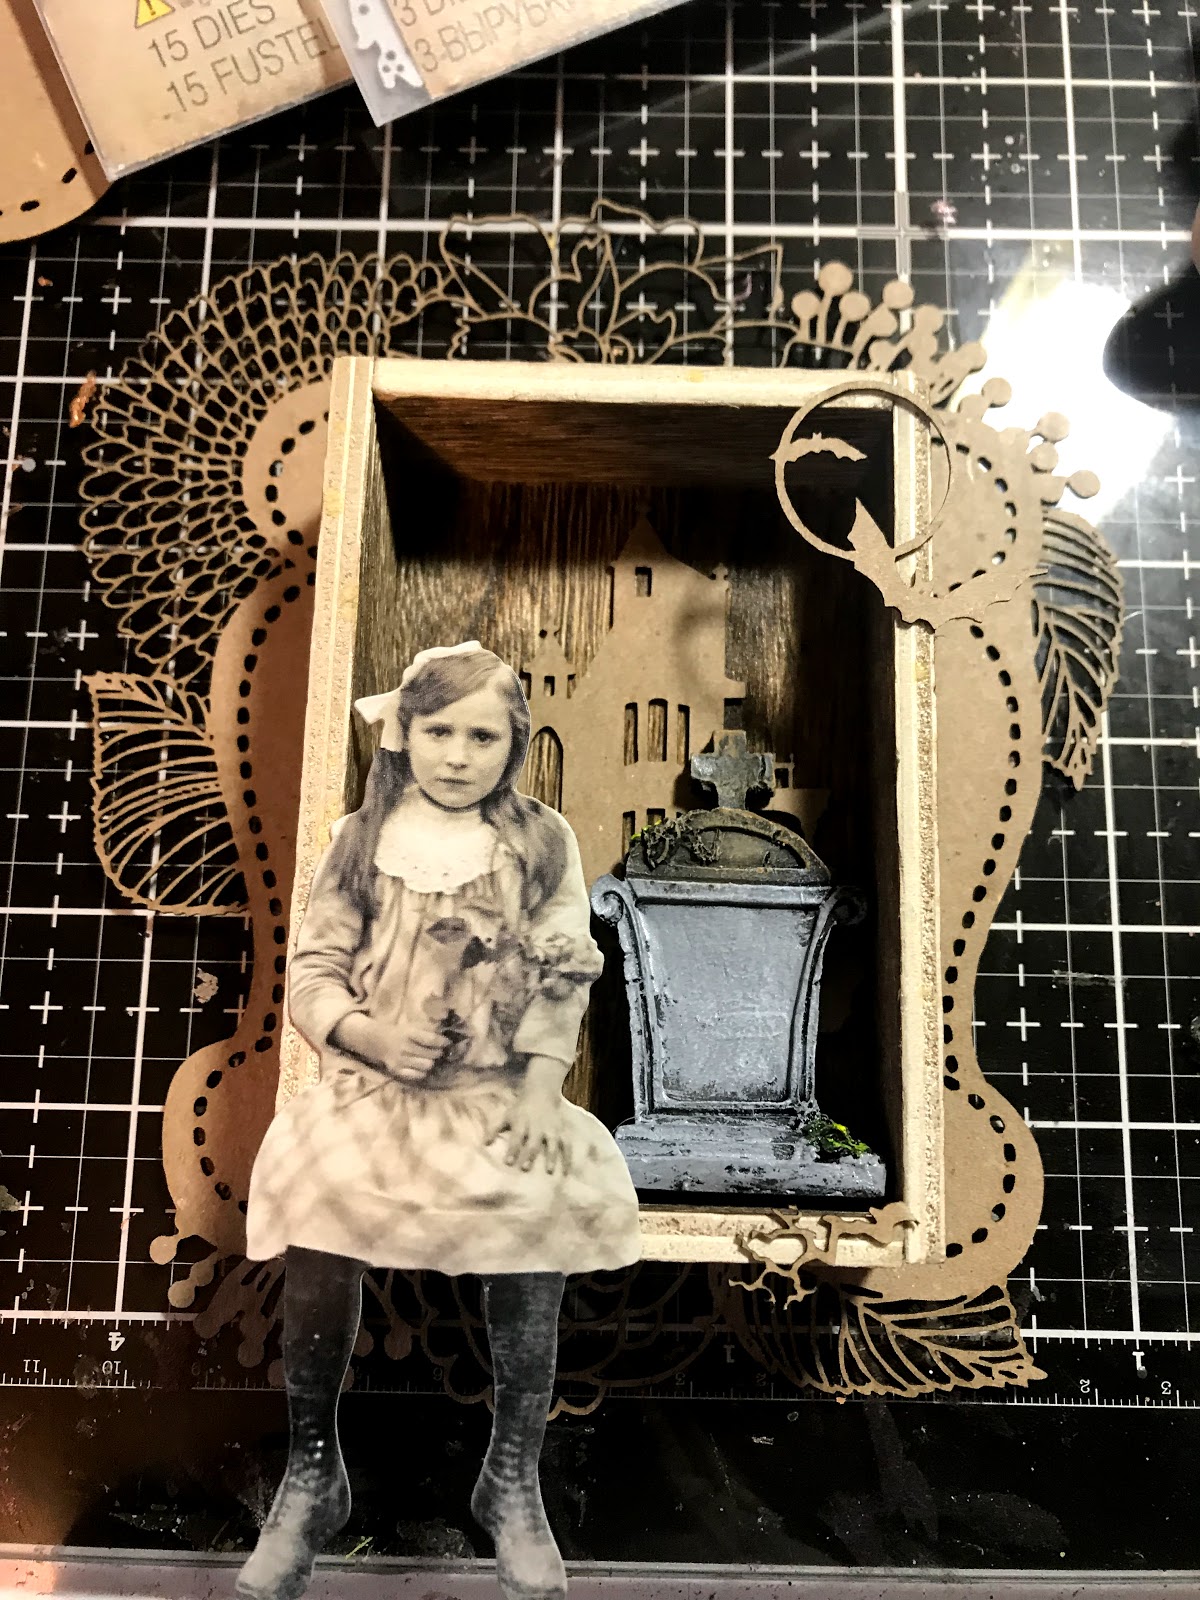
I am up on the Gypsy Soul Laser Cuts Blog today with a wicked little vignette box.
Start by taking a wooden vignette box and layering it on top of your Mini Botanical Journaling Block.  The blocks come in a set of three, so you can play with different sizes.
Cut the house out of the Haunted House Oval.  Trim it down so it fits inside the vignette box.  Emboss the piece with Emerald Creek's Mercury Rising embossing powder.

Treat the outside of the box using Distress Oxide inks in Forest Moss, Hickory Smoke, and Ground Espresso. 

Add a crackle medium.  I really glopped it on so it looks chunky. Mixed with the Forest Moss Oxide ink the box looks a bit moldy.  Moldy is good at Halloween time!

Add paper to the back of the box and glue it in place.  Glue the house to the background.  Add fabric tape all around the edges of the shadowbox and set it aside. 
Use the largest of the Mini Botanical Journaling Blocks and cover the entire piece with gesso.
Add your sentiment cut from the Tim Holtz Halloween script, Christmas Script, and Holiday Words.  
Time to start adding Distress Crayon.     
Add crayon and move it around using your fingers.  
Cover the front using the same technique.  Add more saturated colors on the flowers and leaves. A bit of Distress Paint in Tarnished Brass gets smudged all around the edge of the block. 


Cut the bats and moon out of the Haunted House Oval.  Emboss the bats using the mercury rising powder.  Emboss the moon using Charred Gold.  


Glue the shadowbox to the center of the journaling block.  Add the bats to the front of the box.  Glue in a Tim Holtz tombstone with rub ons added.  Glue on the paperdoll.  Don't forget to give her a bouquet of dead flowers wrapped in mummy cloth. Cut a small slit around her hand and she appears to actually be holding the bouquet.

Make a bunch of tiny tattered florals and glue them in a cascade on the top of the vignette box.  A bit of leftover mummy cloth from the bouquet was put to good use up here.  A tiny skull bead aged with mushroom alcohol ink adds an element of surprise. 

Add a wooden finial that has been painted with Black Soot Distress Paint and a bit of Tarnished Brass. A bit of fabric tape that is around the edge of the box is wrapped around the finial.  Mummy cloth and a few more flowers complete the base. 
Here's the back of the Mini Botanical Journaling block all done up.
Happy Haunting!
Jess


Haunted Halloween  Challenge Frilly and Funkie


Disclaimer Notice

I've received products/compensation as part of the Gypsy Soul Laser Cuts Design teams. My projects, however, are 100% my own.