Showing posts with label distress crayon. Show all posts

Monday, April 1, 2019

Spring Cleaning

Hi Everyone,
I'm up on the Gypsy Soul Laser Cuts Blog today.

Well it's time to do some spring cleaning and that includes my desk.  I try to be a neat crafter, but my desk always ends up looking like a large bomb exploded in the general vicinity.  For today's project I used only items that were on my desk or within reach of my desk.  I will admit some of these are mop up tags, so I don't know exactly what is on there.

Adventure is out there tag-

The butterfly man background was made using Vintage Photo Oxide Spray and then I added Hickory Smoke ink through a stencil(THS091).  I shifted the stencil and added Peeled Paint Oxide Ink.  I splatted on some Black Soot Distress Paint and then stamped the flourish(CMS070) in  Ground Espresso Archival Ink.  The edges got a bit of Vintage Photo Distress Crayon for shadow.

The paper doll was inked up using Tsukineko Inks.  His buttons and watch chain were colored using gel pens.  Get got a pair of wings and was glued to the tag.  I had a snippet of the mini provincial impresslit left so I popped that in the top corner.  Chic chat words were inked up using Peacock Feathers Distress Ink and glued down.

A snippet of the Meadow Flowers was on my desk so I added a couple layers of gesso and once that was dry I added PaperArtsy Infusions in The Sage to the stems.  I added grit paste to the flowers and used Peacock Feathers Distress Ink to color them.  There was some leftover Distress Crayon on my desk from edging the tag and I used that to dirty up the flowers.  Once that was glued down, I added detail using gel pens.

Eccentric, but very estimable gentleman-

For the eccentric, but very estimable gentleman tag I used a mop up tag that had some blues and purples on it.  I added some leftover rust from when I was rusting up bits and some Seth Apter Stamps(Eclectica3). 
The circles are from the Mixed Media Fragments 1 Small.  I rusted them using PaperArtsy's Rusting Powder and then added Verday Paint from 10 Second Studios for the oxidized brass bits.  I cut the circles into three segments and attached them to the card using glue.  I added Tim Holtz Hardware heads to make them appear to be bolted down. I added alcohol ink in Patina, Mushroom, and Coffee to the hardware heads.  Then I popped on a bit of Distress Crayon in Cracked Pistachio for a bit more dimension.

I tied a little brass heart to his wrist and glued him down.

 Clipping stickers make for really fun stories and gel pens add the final bits to this tag.

The Proprietor of Ideas-

This little guy gets stuck in all kind of things.  Today I popped him in a lightbulb from the Steampunk Lightbulb Set.  The lightbulb was painted white and then the bulb portion was given a layer of DecoArt Crackle Glaze.  Once the glaze was dry I added Distress Crayon in Black Soot and Brushed Pewter.  A thin piece of acetate was added behind the bulb and colored with mushroom alcohol ink.  The tiny crown on his head will be coming soon to the GSL cuts store(I cannot wait for you to see all of these teeny crowns).
The base of the bulb was painted with Tarnished Brass Distress Paint and then pounced with Mushroom, Latte, and Coffee Alcohol Inks. I snuck in another hardware head here and a story stick.
This tag was made by using Oxide Spray on my gel plate.  It makes such gorgeous and dreamy backgrounds.  I used a Tim stencil(THS051) for the words and numbers.  I used Hickory Smoke and Black Soot Distress Ink for the coloring.  White paint is splattered all over the back, Perfect Pearl spray, and gel pens finish the background.
The main title is from the Tim Holtz Noble Gent set(CMS301).  That was stamped in Black Soot Archival.  The little halo around the bulb is the same set.  I used Dina Wakley Paint in Ancient and Gilt to stamp out the halo.  Be sure to clean paint off your rubber stamps right away!   


Do you save all of your little bits to make projects with later or do you toss out the scraps?

Jess

Monday, March 18, 2019

Spring toadstool fairy exploding canvas


Hi Everyone,
I'm up on the Gypsy Soul Laser Cuts Blog today.
The weather has been so nice here.  Flowers are blooming and pretty soon we will start seeing the baby ducks in our little neighborhood lake.  It's also the time of year when I start to make fairies.  Ah, who am I kidding I love to make fairies all year round!

A couple years back I made an exploding canvas and I totally loved the process.  I decided it was time to make a new one and this time I gave it a little twist.  I knew I wanted a tiny fairy so my canvas had to be small  too.
I started by covering a 5x5 canvas with Tim Holtz Collage paper.  I used collage medium to adhere it to the canvas and coated the top too.  I dried it with a heat gun.  Once the collage paper was dry I used texture paste and a flower stencil to add detail to the top and bottom corners.
I sprayed the canvas using Distress Oxide Spray in Peeled Paint, Vintage Photo, and Iced Spruce.
 I added paint splatter in black(Distress Black Soot) and gold(Dina Wakley Ancient).   I used Distress Crayon in Lucky Clover to enhance the texture paste flowers. At the end I decided to add a bit of Worn lipstick and Picked Raspberry Crayon to the flowers too. 
Once the paint was dry I flipped the canvas over and used a different collage paper to line the inside of the canvas.  I blasted it with the heat gun and then cut the canvas up.  You can see the cut lines.  This is the scariest part of the whole process, but the outcome is fabulous.  
Before I started prepping my canvas I took the Mini Shadowbox set and put together a couple of the boxes I thought might fit into the frame.  Once I had one that fit right I started working on the canvas.  I didn't want to get this far into the thing just to discover that what I thought it would look like in my head would not work out at all. 
After the canvas was cut I glued the pieces to the front of the canvas creating an opening.  
For the hollow, I wound up using the smallest of the shadowboxes.  The fun thing about the box this size is that it doesn't take much paper to cover it.  I spritzed a manila tag with Worn Lipstick Oxide Spray and let it air dry.  The air drying seems to make it oxidize a bit better(it also could be my imagination).I gave it a quick mist of water on either side and ran it through my 3d Kaleidoscope  embossing folder.  This one tag covered the entire outside of my box with some to spare! I sanded the tag a bit and added some Distress Crayon in Gathered Twigs to highlight the raised areas.  
For an added detail I ran metal plumbing tape through my impresslit folder.I colored it using gold, latte, and caramel alcohol inks.   

I cut the manila tag to cover the outside of the shadowbox I used the faux dresden to cover the edges.  The edge of the dresden is the perfect size to cover the edge of the chipboard. 


The inside of the box was lined with paper and washi tape.  I really just wanted the little flowers to peep through in the back there.  I added some spun cotton toadstools, moss, and a teeny paperdoll.  The new Tim Holtz  wings work perfectly on this guy.  
To finish the canvas I colored seam binding using the Worn Lipstick Oxide spray and a bit of Tea Dye Distress Spray.  I made a fluffy bow and added a word band. In the top corner, opposite from the bow, I added a flower cluster with some additional moss.    


Happy Spring! 
Jess


Monday, December 17, 2018

Good tidings ATC journal


Hi Everyone,
I have a really fun project to share with you that I created for Gypsy Soul Laser Cuts.
This ATC ticket journal is the cutest thing ever.  


I made one of these a few months back.  You can check out that post here.  When I was creating my spring themed journal all I could think about was how cute this would look done up for Christmas.
The basic steps are the same as the Spring journal.  Prep the journal by painting it.  Using collage medium, add Tim Holtz Christmas Collage paper randomly to each page.  

Once all of your collage paper is down add stamps using a permanent ink. I mostly used the Tim Holtz Holiday Postmark Set(but if you look closely you will spy stamps from about 5 other sets).  You can also use paint on your rubber stamps, just make sure you clean them off right away.  Once it's dried it will be on there forever.  The funky green branches you see here are stamped.  Stamp in a green paint and then add red berries with the end of a paint brush.  

 These are all of the inside pages.  I put a photo on every other page and the opposite sides are just fun piles of ephemera.
Most of the photos got a little something to dress them up for the holidays.  
These little anter brads just crack me up.  I used some of the Tim Holtz holiday snippets, a photobooth photo, and a chit chat sticker here too. 
This guy's hat and scarf are from the Christmas Shape Set.  Both pieces were embossed using Emerald Creek powders.  The hat is Mercury Rising and the scarf is the Spiced Candy and then there is a layer of Vintage Beeswax.    
Her wintery broach is from the Snowflake shape set and covered with Distress Glitter.  
Here are the rest of the pages.  This one has a little 3d stag sticker. 

Her santa hat is a brad.

The peppermints are made out of perler beads. 

I love the vintage Christmas seal on this page.  

The tree is from the Christmas Shape Set.  It was heat embossed using Charred Gold from Emerald Creek.    

I did my cover last.  The ribbon is glued under the frame and it has an eyelet in it.  The buckle is attached with a brad that you can see on the backside of the page.  The chip quote is embossed with Charred Gold on the edges 
The center of the poinsettia is the brad that is holding on the buckle.    
The buckle was a great way to hold this guy together since it's pretty chunky.  

I hope you enjoy this little book.  I had a blast making it.  Have a very Merry Christmas! I hope there is no coal in your stocking.


Monday, October 15, 2018

Greetings from Regions Beyond


Hi Everyone,

I am up on the Gypsy Soul Laser Cuts Blog today with a wicked little vignette box.
Start by taking a wooden vignette box and layering it on top of your Mini Botanical Journaling Block.  The blocks come in a set of three, so you can play with different sizes.
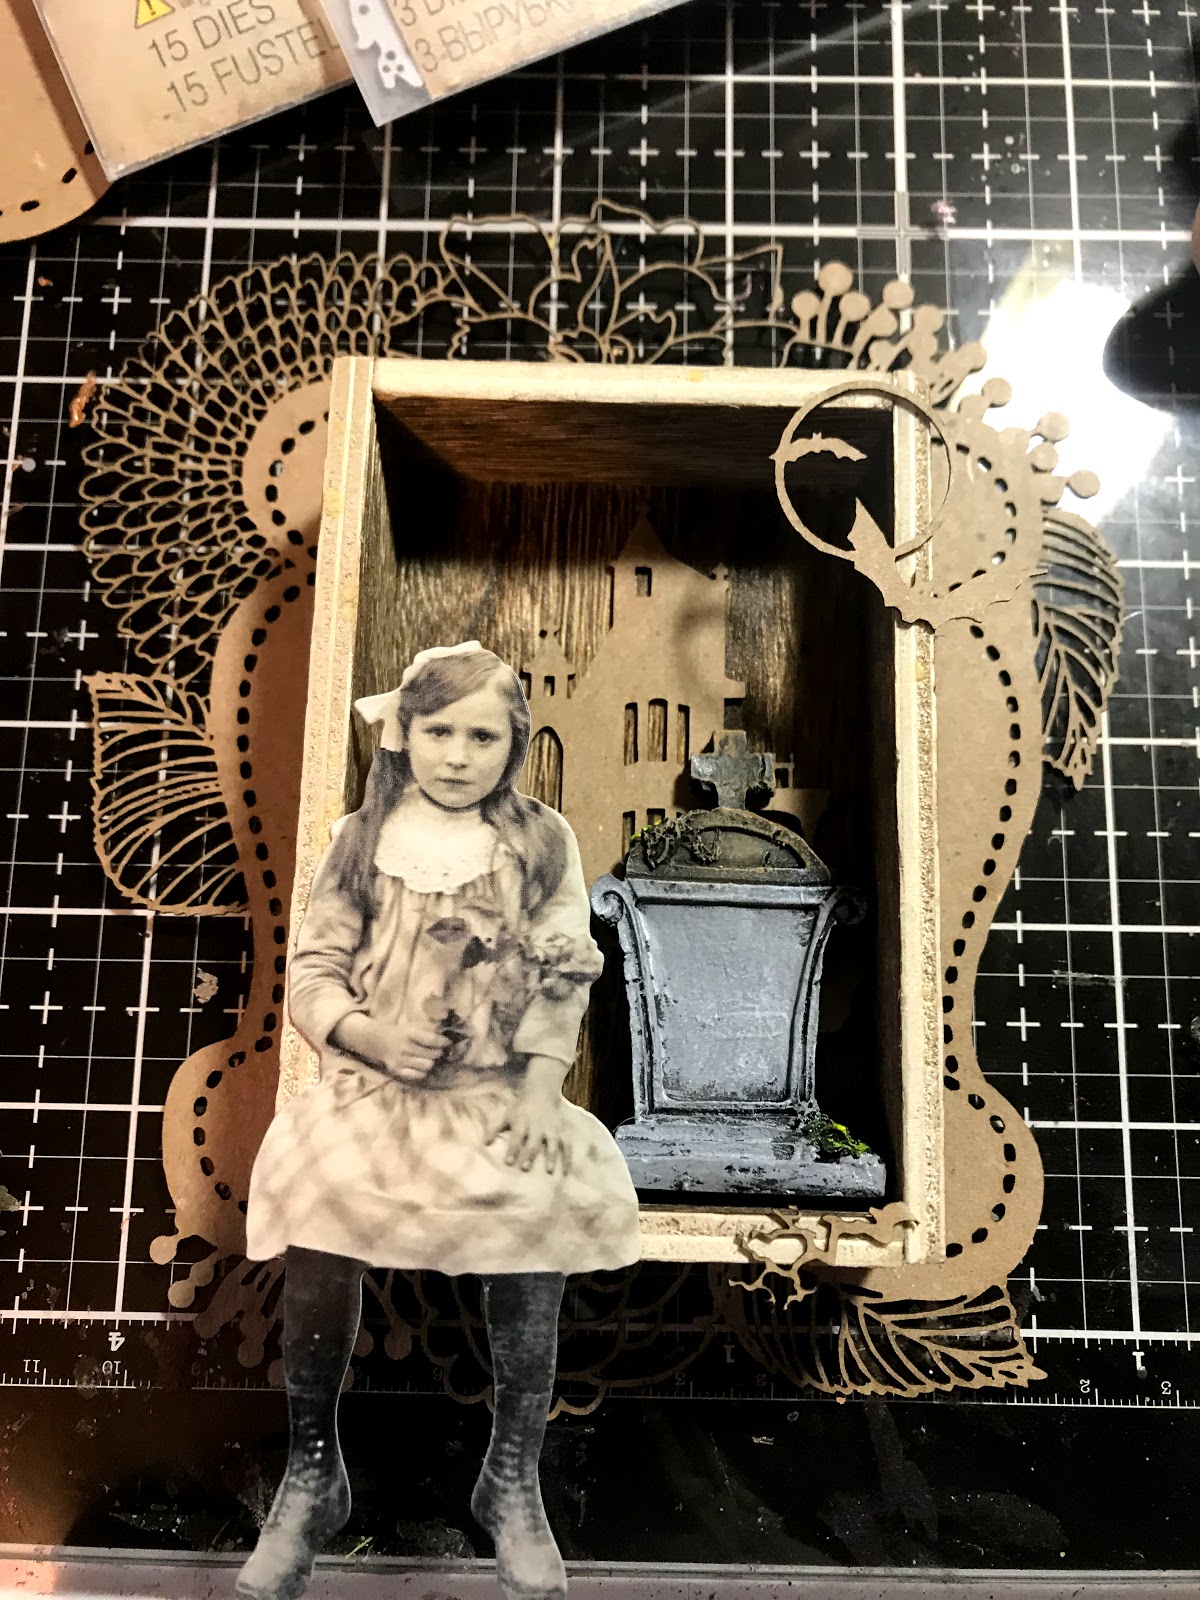
Cut the house out of the Haunted House Oval.  Trim it down so it fits inside the vignette box.  Emboss the piece with Emerald Creek's Mercury Rising embossing powder.

Treat the outside of the box using Distress Oxide inks in Forest Moss, Hickory Smoke, and Ground Espresso. 

Add a crackle medium.  I really glopped it on so it looks chunky. Mixed with the Forest Moss Oxide ink the box looks a bit moldy.  Moldy is good at Halloween time!

Add paper to the back of the box and glue it in place.  Glue the house to the background.  Add fabric tape all around the edges of the shadowbox and set it aside. 
Use the largest of the Mini Botanical Journaling Blocks and cover the entire piece with gesso.
Add your sentiment cut from the Tim Holtz Halloween script, Christmas Script, and Holiday Words.  
Time to start adding Distress Crayon.     
Add crayon and move it around using your fingers.  
Cover the front using the same technique.  Add more saturated colors on the flowers and leaves. A bit of Distress Paint in Tarnished Brass gets smudged all around the edge of the block. 


Cut the bats and moon out of the Haunted House Oval.  Emboss the bats using the mercury rising powder.  Emboss the moon using Charred Gold.  


Glue the shadowbox to the center of the journaling block.  Add the bats to the front of the box.  Glue in a Tim Holtz tombstone with rub ons added.  Glue on the paperdoll.  Don't forget to give her a bouquet of dead flowers wrapped in mummy cloth. Cut a small slit around her hand and she appears to actually be holding the bouquet.

Make a bunch of tiny tattered florals and glue them in a cascade on the top of the vignette box.  A bit of leftover mummy cloth from the bouquet was put to good use up here.  A tiny skull bead aged with mushroom alcohol ink adds an element of surprise. 

Add a wooden finial that has been painted with Black Soot Distress Paint and a bit of Tarnished Brass. A bit of fabric tape that is around the edge of the box is wrapped around the finial.  Mummy cloth and a few more flowers complete the base. 
Here's the back of the Mini Botanical Journaling block all done up.
Happy Haunting!
Jess


Haunted Halloween  Challenge Frilly and Funkie


Disclaimer Notice

I've received products/compensation as part of the Gypsy Soul Laser Cuts Design teams. My projects, however, are 100% my own.