Showing posts with label Stampers Anonymous Stencils. Show all posts

Monday, March 18, 2019

Spring toadstool fairy exploding canvas


Hi Everyone,
I'm up on the Gypsy Soul Laser Cuts Blog today.
The weather has been so nice here.  Flowers are blooming and pretty soon we will start seeing the baby ducks in our little neighborhood lake.  It's also the time of year when I start to make fairies.  Ah, who am I kidding I love to make fairies all year round!

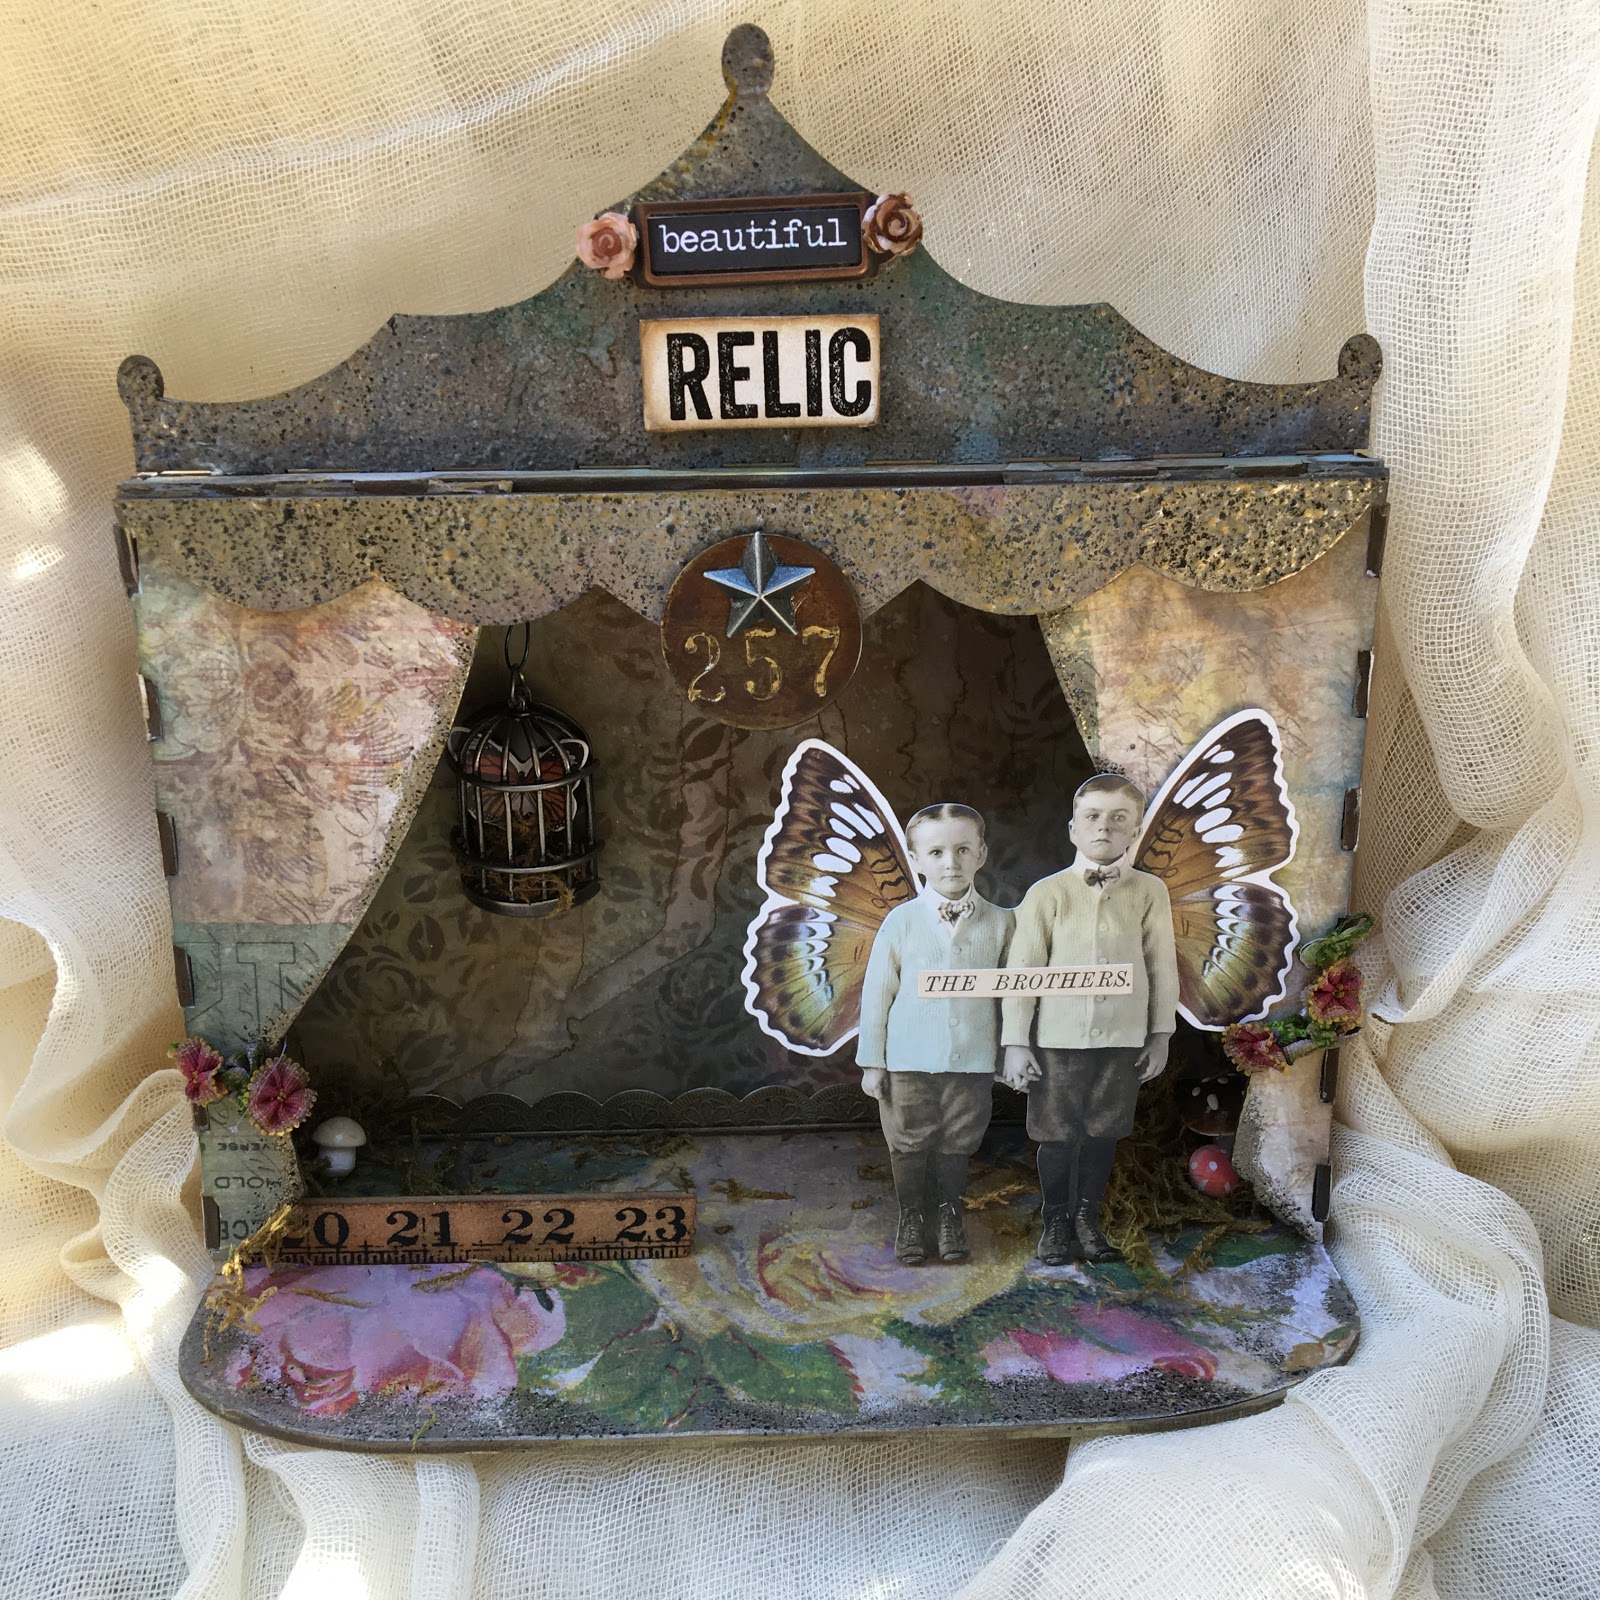
A couple years back I made an exploding canvas and I totally loved the process.  I decided it was time to make a new one and this time I gave it a little twist.  I knew I wanted a tiny fairy so my canvas had to be small  too.
I started by covering a 5x5 canvas with Tim Holtz Collage paper.  I used collage medium to adhere it to the canvas and coated the top too.  I dried it with a heat gun.  Once the collage paper was dry I used texture paste and a flower stencil to add detail to the top and bottom corners.
I sprayed the canvas using Distress Oxide Spray in Peeled Paint, Vintage Photo, and Iced Spruce.
 I added paint splatter in black(Distress Black Soot) and gold(Dina Wakley Ancient).   I used Distress Crayon in Lucky Clover to enhance the texture paste flowers. At the end I decided to add a bit of Worn lipstick and Picked Raspberry Crayon to the flowers too. 
Once the paint was dry I flipped the canvas over and used a different collage paper to line the inside of the canvas.  I blasted it with the heat gun and then cut the canvas up.  You can see the cut lines.  This is the scariest part of the whole process, but the outcome is fabulous.  
Before I started prepping my canvas I took the Mini Shadowbox set and put together a couple of the boxes I thought might fit into the frame.  Once I had one that fit right I started working on the canvas.  I didn't want to get this far into the thing just to discover that what I thought it would look like in my head would not work out at all. 
After the canvas was cut I glued the pieces to the front of the canvas creating an opening.  
For the hollow, I wound up using the smallest of the shadowboxes.  The fun thing about the box this size is that it doesn't take much paper to cover it.  I spritzed a manila tag with Worn Lipstick Oxide Spray and let it air dry.  The air drying seems to make it oxidize a bit better(it also could be my imagination).I gave it a quick mist of water on either side and ran it through my 3d Kaleidoscope  embossing folder.  This one tag covered the entire outside of my box with some to spare! I sanded the tag a bit and added some Distress Crayon in Gathered Twigs to highlight the raised areas.  
For an added detail I ran metal plumbing tape through my impresslit folder.I colored it using gold, latte, and caramel alcohol inks.   

I cut the manila tag to cover the outside of the shadowbox I used the faux dresden to cover the edges.  The edge of the dresden is the perfect size to cover the edge of the chipboard. 


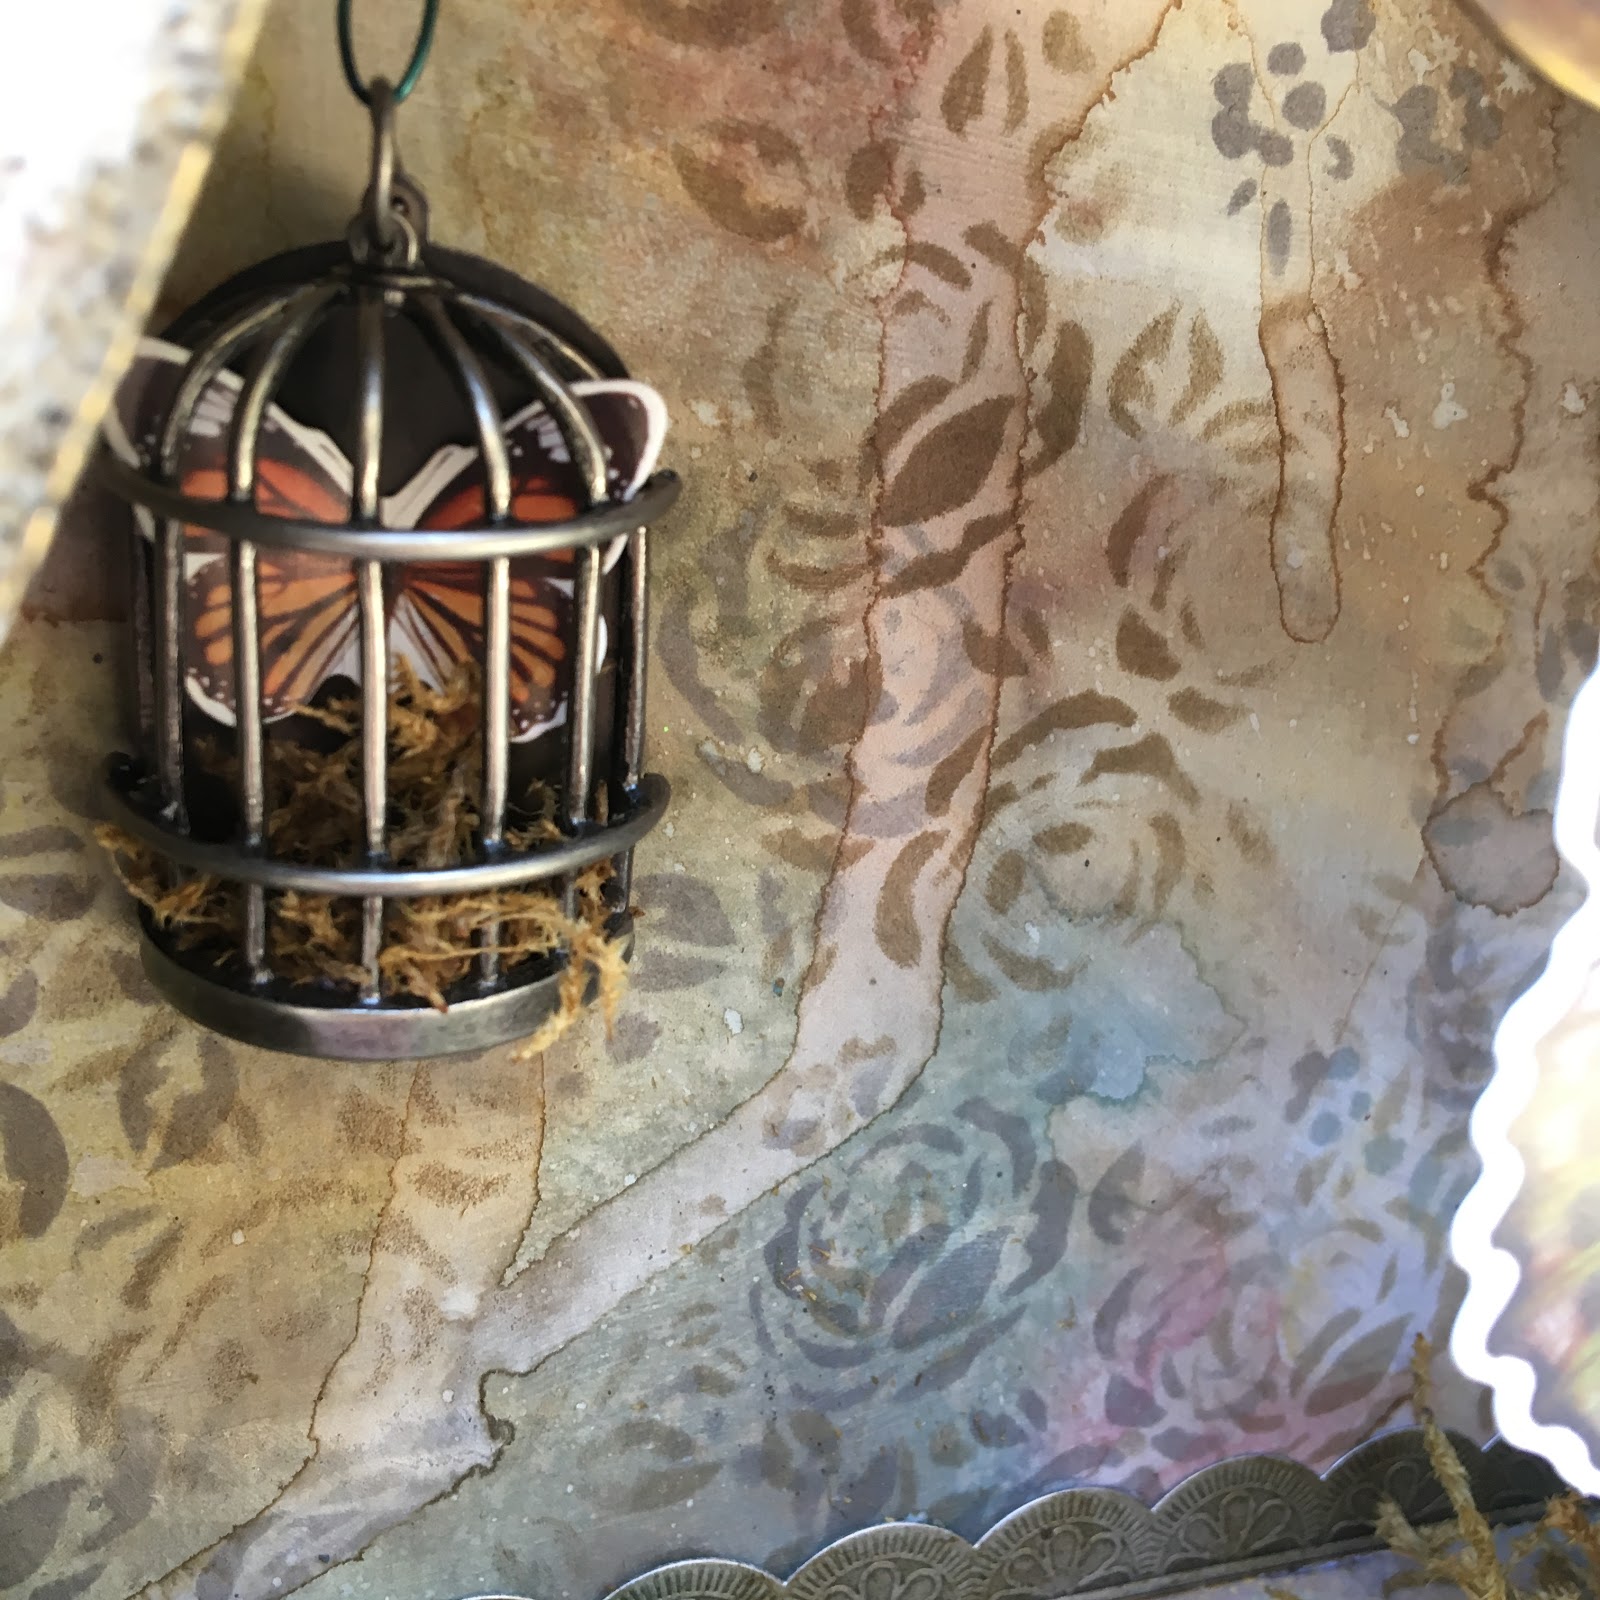
The inside of the box was lined with paper and washi tape.  I really just wanted the little flowers to peep through in the back there.  I added some spun cotton toadstools, moss, and a teeny paperdoll.  The new Tim Holtz  wings work perfectly on this guy.  
To finish the canvas I colored seam binding using the Worn Lipstick Oxide spray and a bit of Tea Dye Distress Spray.  I made a fluffy bow and added a word band. In the top corner, opposite from the bow, I added a flower cluster with some additional moss.    


Happy Spring! 
Jess


Wednesday, April 25, 2018

New Stamps from Blank Page Muse Part 2

Hi Everyone,
I am back today with the project I created using Cathy Frailey's new Soulful Dolls stamps. 
This is a canvas pennant flag that I grunged up using Distress Inks in Worn Lipstick, Vintage Velvet, and Fossilized Amber.  I used Tim Holtz's Floral stencil and used the various ink shades to add the flower pattern. 
Once the flower pattern was on there I flicked on Distress Paint in Black Soot and Dina Wakley Paint in Gilt.  I used Distress Crayons around the edge of the banner.  
The chipboard frame(Gypsy Soul Laser Cuts) was embossed using Charred Gold Embossing powder(Emerald Creek).  I cut a piece of yellow Tim Holtz cardstock to fit in the frame. Then using the Fossilized amber and the stencil, I added more flowers. 
The doll stamp is stamped in Jet Black Archival and then colored using Distress Crayons.  I added wings and colored them the same way.  SHe is holding a tiny love letter and wearing a paper flower in her hair.
I used foam tape to raise her up in the frame a bit.  The sentiment is also stamped in Jet Black Archival and mounted with foam tape.  
Large paper flowers finish out the banner.  

I hope you like the new stamps as much as I do! 
Happy stamping,
Jess


Thursday, March 9, 2017

Beautiful Relic Stage using Distress Oxides

I started out this morning playing with my Distress Oxides and made this tag.

I wanted to put a Paper Doll on it, but the one I chose was too big.  My tag evolved into this.


I used a stage from Gypsy Soul Laser cuts as my base.  I covered the base, the sides, and  the curtains with paper from Tim Holtz's Wallflower pad.  I used a piece of Prima paper for the back.
I used Distress Oxide ink in Vintage photo along the top and then sprayed it with water to make the runs.  The sides, curtains, and base received the same treatment but I used various colors of the Oxides. 
The back was coated with a very thin layer of gesso.  I then blended and sprayed the Oxide inks until I achieved a patina I liked.  Once it was all dry I used my mini stencil with Archival inks in Watering Can and Hydrangea for the flowers.  It looks like old water stained wallpaper.
The top and the bunting are embossing using Charred Gold powder.  I used oxide inks and crayons to get the different shades.  
I added some moss and mushrooms to add to the decayed look of the piece.  I am normally really particular about making sure the raw chipboard edges are painted, but I think it added to the look I was going for.  
I need to get back to playing with my inks now :)

A Vintage Journey- All Aboard
Country View Challenges- Inspired by Tim Holtz
 Simon Says Stamps Monday- Make your own Background
Creative Carte Blanche- Numbers, Numbers, Numbers


Monday, March 6, 2017

Spring Chics

Ah,  spring. I have some spring chics for you today.
 I made these for Gypsy Soul Laser Cuts.  Be sure to stop by the blog and see the other wonderful creations the DT has been making.


I started by coating my tag with a layer of collage medium and add bits of ripped tissue wrap.  Next I scribbled a light layer of  Distress Crayon in several colors.


In the one you see here I used colors that reminded me of a sunset.  I placed a stencil over the tag and rubbed away some of the crayon using an almost dry baby wipe.

I buy the cheapest baby wipes I can find.  They tend to be rough and pretty dry(not exactly what you'd want to use on a baby's bottom, but awesome for crafting). For the final step on the tag I added speckles of black and gold paint.  I also used some gold paint and just smeared it with my fingers.

Obviously, this is a close up of one of the other tags, but you can see the speckles. 


I took one of the bird nests from the For the Birds set. I inked the top part using brown Distress inks. The bottom piece is embossing using Emerald Creek's San Tropez Tan.


I cut out a vintage lady and plopped her in the nest.  I decided the tag needed a bit more interest so I used a stencil and distress crayon to make the tracks down the side. Once the sentiment was added I randomly scribbled around on the tag.


I decided she needed some friends so I made a couple more tags using the same technique and different bits of the For the Birds set.
This girl had her house made with Emerald Creek's Salted Navy and Hammered Metal embossing powders.  

This one used the San Tropez Tan on the top and I ran my Distress Crayons over it to make it darker in areas.  

I hope you like the girls and try to make some of your own!
Simon Says Stamp Make your own Background Challenge
A Vintage Journey- All aboard challenge

Monday, July 11, 2016

Altered Matchbook

Over the weekend I posted a sneak peek of this before I had my blog post ready to go.
Wow! I got a crazy response to this little matchbook when I posted it on Facebook and Instagram. Please excuse the wiggly camera.  I was shooting it myself and I also had terribly chippy nails I was trying to keep out of the shot.  
I followed this amazingly simple tutorial to make mine.  
Here are some better photos of my little matchbook!
I used manila to make my base and covered it with Distress Inks. Black acrylic ink was pounced through my stencil to complete the back.  The little book is just a light weight cardstock folded according to the tutorial instructions.  
All of the ladies are from Art Chix Studios.  
I hope you enjoy seeing some closer looks!

Jess


Sunday, May 22, 2016

Guest Posting on Our Creative Corner

I am so excited to be guest posting over at  Our Creative Corner today! My mermaids won their Return of the Challenge challenge.  Here is the project I created for them.  Please pop over and check it out there too.


I started by using my gelli plate, stencils, and acrylic paint to make my background on a canvas tag.

My focal image is from the Tim Holtz Winged Things stamp set.  The little fairy is colored using Distress Inks and Crayons.

 I made the tiny tattered floral flowers and branches using the tissue paper and collage medium technique I showed a couple posts back.

Once they were dry I ran them through my die cutting machine and added some bling to the flowers.
I stamped on the tag using Archival ink and used white acrylic paint to highlight areas.  Black Soot Distress Crayon darkened up the stitching around the tag.  I also scribbled with my black Fude ball pen around the fairy and the sentiment.
What have you been crafting?
Jess

Friday, February 19, 2016

February Tim Tag

I feel like I have been missing from here for a while now.  I changed jobs back in September.  I had been with my last company for 15 years and while leaving was a good choice, I still felt like a was in mourning.  I wasn't happy for a long time and needed to change.  I stepped into a new job and had to learn it very quickly since the holidays were fast approaching. During this time I was also juggling three different design teams.  It was all too much.  While I did enjoy a more relaxed holiday season and more importantly more time with my family, I have also decided in addition to changing jobs that I wanted to take a break from the design teams I was on.  I love working with the teams, but I wanted to just create for a bit with no pressure and no deadlines.  
So, I hope to get back to posting on a more regular basis and entering challenges too.  After all of that babbling here is my Tim tag for the month!
Thanks for letting me babble and I hope you enjoy my take on the tag.  
Jess

Saturday, January 16, 2016

Badges made with Gelli prints

A few weeks ago I joined the Gelli printing trend.  I know I am like five years late to the party.  I wasn't sure I really needed one.  I did.  You do too.
These are a couple of the prints I made on my first day.  It is so stinking easy to do.  You slap on paint and layer on stencils.  Boom-art! I had a blast.  I even got my six year old daughter pulling prints.  
So now I have this huge stack of prints and they are just hanging out.  What do I do with them? I made some fun and funky postcards(I will share those a bit later as I am sending some out for swaps). 

I also had these awesome black and white stickers from Flow magazine.  I decided to color in the stickers using my Distress Markers and stamp on them a bit with a Finnabair stamp set.  
Once these were colored in I realized they would look awesome on my Gelli prints.   I had a bunch of leftover pieces that I punched into circles and I started layering. 
I added some extra details using a black pen and a white pen. The words are Chit Chat from Tim Holtz.  
They look pretty cool on their own.  I took them down and had color copies made so I can play with them even more. 
I poured resin on some of them to make magnets or maybe necklace pendants.  
The rest I have been turning into badges. 


All of the ones above are pins.  I added extra touches on them like silver leaves, millefiori flowers, resin flowers, and crowns.  Some just have ribbon danglers, but others have some beads as well.  


These two are magnets.  All of the circles are printed on cardstock and mounted on a heavy mat board for extra support.  

I love how well the Gelli prints copied.  I can make a bunch and still keep my originals. 

How do you use your Gelli prints?

I am entering these into: Simon Says Stamp Monday Challenge-Stencils 
Jess


Disclaimer Notice

I've received products/compensation as part of the Gypsy Soul Laser Cuts Design teams. My projects, however, are 100% my own.