Showing posts with label brad. Show all posts

Monday, January 16, 2017

Mermaid Dreams at CHA


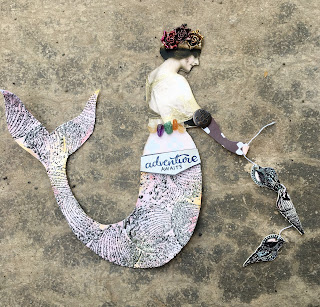
You guys, I am going to Creativation! This year CHA, is being called Creativation and I get to go.  This has been a huge goal of mine since I started crafting a bit more seriously.  I am so thrilled to be going with Emerald Creek Craft Supplies. I want to show you some of the items I have made that will be on display there.  


I made a trio of adventurous mermaids.  All of their tails are made using Distress Inks for the color.  The stamps are all Emerald Creek and the Embossing Powders too.  Here are some closer looks. 


All of the verbiage you see on these girls is from Wild Whisper Designs
  The stones are a new product and they are fabulous.  These are real deal gemstones-perfectly sized for crafting. The new stones shown here are: moissanite, aventurine, pyrite, citrine, amethyst, and carnelian.  There are a few more coming too.  


I wish you could see these in person.  The stones are stunning.  

I cannot wait to take a billion photos and show you everything I see at CHA.  
Jess


Emerald Creek Charred Gold Embossing Powder
Emerald Creek- Floral Spray Charm

I am entering these adventurous girls into the Frilly and Funkie New Year's Challenge

Saturday, March 14, 2015

Shoes!

I love shoes. I own far too many pairs.  Even if I don't wear all the gorgeous shoes I have I still like to admire them from time to time.  And who says you can't do housework in your Dolce and Gabbana heels with suede fringe and feathers?
Stop by the Robin's Nest to read more about my love affair with shoes and check out this sassy lady.


What have you been crafting?
Jess

Thursday, November 20, 2014

Christmas Cabinet Card

I have missed out on the last two Compendium of Curiosities 3 challenges. I am squeezing this one in under the wire!  You must check out this challenge.  It is so fun if you are a Tim Holtz addict.  Tim and Mario have donated prizes for each of the challenges.  This particular challenge is also sponsored by The Inspiration Emporium.  The crew over there rocks.  Amazing customer service!
Without further ado here is my take on the Cabinet Card Pocket.
I have been in a Christmas mood and decided to use this worn cover as my base.  An adorable found relative is the base photo.  I tinted Santa's outfit and her coat, but you cant really tell since I piled on the ephemera.  I essentially tossed the Tim Holtz kitchen sink on here- remnant rubs, a mirrored star, pen nib, crinkle ribbon, industrious stickers, some paper ephemera, naturals ribbon in the red and cream, and the cabinet card itself.  
 
Do you see a little surprise on the top?
It's a secret Santa tag! Love these new holiday flashcards.  I have been dying to use one.  
Another Paula bow on the side and a token to add some fun.  I bound my inside pages using bakers twine. 
The light doesn't really do the color of the cover justice.  I used Barn Door, Tea Dye, and Walnut Stain Sprays.  I also added some Perfect Pearls mist to give it a gold shimmer. 

A few more closeups for you.


I hope you like it as much as I do! 
What have you been crafting?
Jess


Tuesday, August 5, 2014

12 tags of 2014 August- The Muse Speaks

Tim Holtz has posted his tag for August.  He encouraged us just to play and let the creative muse speak to you.

My muse was loud today.  I used Peacock Feathers, Pickled Raspberry, and Scattered Straw distress stains.  I sprayed them on the tag to get big bursts of color and runny drips.  I ran my Scattered Straw ink around the entire tag to fill in the blanks. 
I adore this stamp from Dina Wakley.  I think it is one of my favorites.  She just looks bad ass.  I stamped her in Archival Ink.  I added a bit of washi tape to the side to add some more layers.  
The crown was made with mica and there is a tiny compass on it to always guide her in the right direction.  The paint circles were made using black acrylic and white Distress Paint.  You can see a tiny bit of stenciling up here too.  The blue wooden circle is a game piece (I have no idea what game it came from) with a remnant rub sentiment.  
I used texture paste through my Dyan stencil on top of the washi tape and a bit more in the bottom corner.  
I dipped my paint brush into my Distress Paint and flicked it all over the tag.  I roughed up the edges and then ran Black Soot Distress Ink all around.  The soda top "j" reminds me that this tag is for me! 
I colored the brads using white embossing powder that had a drop of alcohol ink in it.  I didn't want them to be glossy so after I heated them I smashed them into my craft sheet.  Once they were cool I ran Black Soot ink on top.  
The crinkle ribbon was colored with the three Distress Stains and stenciled using Black Soot.  
I know this is totally different from what Tim produced, but this is what my muse said to do!
I hope you enjoy it.
What have you been crafting?
Jess


Monday, July 21, 2014

Pretty Banners for your craft room

Last night I went to Michael's.  I had a gift certificate that was starting to burn a hole in my pocket.  I didn't have anything in mind to buy and I stumbled upon tiny wooden banner pieces.  Best part was they were only 29 cents each!  I bought a bunch and came home to see what I could come up with.  A while back I made a big banner for my daughter's room.
I love the way it came out.  It's so feminine and pretty. I honestly have no idea where I bought these banner pieces.  They were in my stash from the scrapbook convention.  The chipboard letters are from Hobby Lobby.  The glitter is Martha Stewart.  The flowers on the "A" and the "T" are Prima.  The flower on the "K" I made with old crepe paper. 


The little bird is Melissa Frances.  I colored the beak and highlighted the wings with Distress Markers.  The pearl embellishments are from Want 2 Scrap.

The new banner is tiny compared to this one, but it took me longer to make.  Sometimes I think working on a large surfaces makes me work faster.  The smaller surfaces take so much longer to find the right size embellishments.
My walls are a warm tan color so it is hard to get a photo that doesn't look gold.  I love this.  I think the black paper really makes the glittered letters pop.  I started by coloring the back and edges of the triangles with Shaded Lilac distress ink.  The chipboard letters are from recollections.  They were already glittered blue, but I didn't want to use blue for this project.  I used a mixture of Martha's Purple Spinel and Purple Sapphire.  
Of course I took close ups of each letter too.
These purple flowers have been rolling around in my flower box forever.  The middle one was the perfect size.  The two on the end were cut way down and smooshed to make the perfect bud. 
The bling is from Want 2 Scrap.  The black paper is from Pink Paislee. The brad I used on here is part of the coordinating collection.  
Yay! Tiny pompoms make me happy.  The rest of the embellishments on here are all brads that I trimmed the prongs off and glued down. 
This bling is from Prima. 
More coordinating bits on the side.  Buttons from the stash.  Vintage back and white trim on the top.  
Vintage millinery flowers flank a large silver Prima flower.  A little more bling from Want 2 Scrap.  
Here is where I create.  Messy, but I love it.   
What have you been crafting? 
Jess


Wednesday, June 18, 2014

Faux metal box

I had this little wooden box and it's cute, but I wanted to grunge it up.  I decided the best way to do it was to make it look rusty.
Have you tried the faux patina paint from Ten Seconds Studio? This stuff is awesome.  A couple coats of paint and you can make anything look old.  
Once I painted my box it was time to decorate.  While it was drying I dug out some rusty goodness.  
The rose was the perfect addition to the box.  I knew I wanted it to be the focal point.  I had the brass "hers" placard forever.  I used alcohol inks to age it and the brad.  
I rubbed some black paint and alcohol ink one the key plate.  This brass was shinier and just using the alcohol ink wasn't toning it down enough for me.  

Watch gears and remnant rubs finish out the decorating.

Now I have a rusty treasure box to add to my jewelry table. 

What have you been crafting?
Jess


Sunday, May 4, 2014

Tim Holtz May 2014 Tag

This month Tim challenged us to use some of our favorite things in our stash.  When I started digging I knew I had to do a bird themed tag.

I started simply by pulling out all my bird items I wanted to use.  I put them on the tag in the pattern I thought would work.

 Once that was done I cut some thin chipboard to back them up.  At this point I realized the number 8 tag was not going to work.  I ended up using a number 10 tag.

You can see my trinkets don't really coordinate.  There are a lot of brass tones in there, so I went with yellows for my background.  I used Antique Linen, Pumice Stone, Scattered Straw, Vintage Photo, and Wild Honey Distress Ink for the background.
I used the new Wildflower paper to cover my chipboard.  Once covered I distressed the edges and tinted with Vintage Photo Ink.
Now I needed to make the bits a pieces work together.  I colored the resin bird using Distress Markers.  The chipboard bird, wing, frame, and bird stickers were all colored using Alcohol Inks.

Are you ready to see the finished tag?


I topped it off with crinkle ribbon colored with Scattered Straw, Gathered Twigs, and Peacock Feathers.  I gave it a spray of Walnut Ink too. 
Here's the little birdy colored with the markers.  

Here are the other elements colored with alcohol inks.  

This tag makes me happy :)
Stop by Tim's site to see his tag. 
What have you been crafting?
Jess


Disclaimer Notice

I've received products/compensation as part of the Gypsy Soul Laser Cuts Design teams. My projects, however, are 100% my own.