Showing posts with label fairy. Show all posts

Monday, April 16, 2018

Beautiful Girl Pennant

Hi Everyone,
I am back with my second post of the month for Gypsy Soul Laser Cuts.  Today I have a pennant for you. 

I love this technique for making art pennants.  You can make really stunning backgrounds. 
Start by adhering tissue wrap to a canvas pennant using Pellon EZ Steam II.  Once the tissue is firmly attached trim it to size. 
Color your pennant using Distress inks, paints, and crayons.  Emboss the edge in gold.  
Yo can see there is a lot of detail on here.  Lots of inky layers and flicks of paint too. 
Paint your mini journaling block with a cream color and let dry.  Add a layer of gesso to your Layered Bella Frame.  Emboss your Medium Fairy using Oil Rubbed Bronze from Emerald Creek. 
Use Distress Crayons to color your journaling block.  
Emboss the back of the Layered Bella Frame using Ancient Amber from Seth Apter. Color the front using Distress Crayons.  The finished frame has white gel pen around the edge to look like stitching. 
Adhere your frame to the journaling block. Use a bit of foam tape to pop the fairy in the frame. 
Glue the whole piece to the pennant.  
Add your Big Chat stickers and using a Stabilo pencil outline the words a bit.  Add dots with a white gel pen.  
Use a Distress Marker to color the edge of vintage seam binding and wet to make color feather and wrinkle the binding.  Run the seam binding through the slot in the pennant and create your hanger.  Add a large fluffy bow made out of the seam binding.  
I hope you enjoyed the tutorial!
Jess

Friday, January 26, 2018

Make A Wish


Hi Everyone,
I have a full step by step tutorial for you over on the Blank Page Muses Blog today.  
I would love for you to pop over and check it out. 
Jess

Monday, June 5, 2017

Special Delivery


Hi Everyone,
I'm up on the Gypsy Soul Laser Cuts Blog today. 
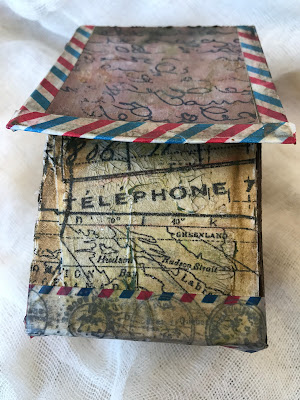
Once again I was a bad design team girl and didn't take step out photos.  Here's the thing, these cabana houses are so easy to assemble I just got carried away.  They just fold together.  A tiny bit of glue or double sided tape and they are done in a flash. 

I started by using some tissue wrap and crazing collage medium to adhere it to the house.  Once the collage medium was dry I used Distress Crayons  and Scribble Sticks to add color.  
I love making my tissue have wrinkles.  I smush and scrunch it until I have enough wrinkles. 

The roof was stamped using the Emerald Creek Kimilese stamp and then colored using Distress Oxide inks in Mowed Lawn and Vintage Photo.  
The roof edges and the bottom of the house have some washi tape.  


The little postman paper doll was colored using my distress markers and given some wings.  The teeny letter and wooden heart complete him.  The house got a bingo marker house number;a word band colored using my distress crayon in Chipped Sapphire; and a clipping sticker.  My teeny house is done. 
The cabana houses come in a set of 5! Such an awesome deal. I've shared another one I made over on my Instagram page(@twomaddahlias).


Sunday, November 6, 2016

My Spirit Cannot be Caged

Hi Everyone,
Since my crafting mojo seems to be on a hiatus right now I thought I would revist some Fairy Cages I made when I was on the Unruly Paperarts design team.  The theme was "Winging It" and those of you that follow me here and on other social media know I am a sucker for a good fairy.


I bought these tiny bird cages on clearance and stashed them knowing that I would find a use for them. I use images from Lisa's Altered Art all the time. She has fantastic ballerinas, women, children, and wing images. When I was playing around one day I discovered some of the girls would fit right in the cages. I added wings to them to make them into fairies. They got all gussied up with tulle skirts, feathers, and bits of bling.


I added a ton of flowers to the bottoms of the cages. Some of the flowers I made and some I purchased. I didn't want the cages to close, so the flowers spill out and wrap around the bases.


The base on this one is a giant wooden spool that is wrapped with twine.


The base on this one is a plaster pillar of some sort (again from the craft hoard). I added a little birdy to the outside of the cage and it's done!


Here's hoping my mojo comes back soon!

Jess

Sunday, May 22, 2016

Guest Posting on Our Creative Corner

I am so excited to be guest posting over at  Our Creative Corner today! My mermaids won their Return of the Challenge challenge.  Here is the project I created for them.  Please pop over and check it out there too.


I started by using my gelli plate, stencils, and acrylic paint to make my background on a canvas tag.

My focal image is from the Tim Holtz Winged Things stamp set.  The little fairy is colored using Distress Inks and Crayons.

 I made the tiny tattered floral flowers and branches using the tissue paper and collage medium technique I showed a couple posts back.

Once they were dry I ran them through my die cutting machine and added some bling to the flowers.
I stamped on the tag using Archival ink and used white acrylic paint to highlight areas.  Black Soot Distress Crayon darkened up the stitching around the tag.  I also scribbled with my black Fude ball pen around the fairy and the sentiment.
What have you been crafting?
Jess

Sunday, December 6, 2015

I don't color inside the lines

Yes, it's true, sometimes I don't color inside the lines.  Art is supposed to be freeing.  When I saw this quote I knew I had to create something using it.  Stop by the Robin's Nest to see the wood panel I made.


Thursday, June 25, 2015

Fairy trophies

Yep, still making trophies! I can't get enough of these things.  


This one has hand dyed tulle.  The image is from Lisa's Altered Art.  


 This image is from Tammy Tutterow.  The blocks I used are from a set of children's blocks I picked up at the thrift store.


This image is from Tammy and the wings are from Lisa. 
I am entering this into the Mixed Media Monthly Year of Choices Challenge.  I have lots of pink, flowers, and ribbon on these guys for this challenge.  
What have you been crafting?
Jess

Thursday, June 11, 2015

Fairy boats

I have a love for fairies, the tinier the better.  I love to be able to plant them in tiny gardens of flowers and mushrooms.  They just make me happy.
The largest of these measures 3 1/2 inches from the bottom of her boat to the tip of her flower wand.  Once again Lisa's Altered Art provided me with my starting point.
Everyone got some glitter and bits of bling.  

Each fairy was fussy cut out of cardstock and then I cut the same image out of regular paper.  I trimmed out just the wings and attached them to the fairy.  

You can see both sets of wings here.  

Then each one got a tart tin boat filled with moss and flowers. 

They each have a different staff depending upon what type of fairy they are.  
I am entering this into the Our Creative Corner- What Makes You Smile challenge.  

What have you been crafting?
Jess

Disclaimer Notice

I've received products/compensation as part of the Gypsy Soul Laser Cuts Design teams. My projects, however, are 100% my own.